 In this Photoshop tutorial I will show you how to create the Adobe CS3 style icons using some basic gradients and layer styles. Without question, this gonna be full of clear and concise instructions, instead of telling you to blindly perform this and then that step, I'm gonna explain WHY the action is required.
This is revolutionary. This is educational and well worth the investment of your time and effort, because we are all... learning.
Enuf with that chit-chat... :)
| STEP 1 Create a new blank 500x500px layer by hitting the Ctrl + N or simply clicking the New Layer icon at the bottom of the layers palette and name it Background Square then select the Rectangular Marquee tool (M) and drag out a nice square for the icon’s background. (*note: By holding the Shift key while you drag you can constrain your selection to a perfect square. My square is 300×300 pixels). |
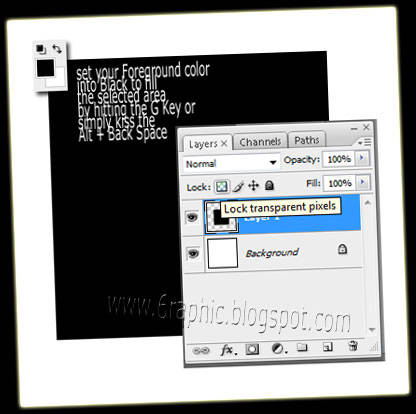
| STEP 2 Press the D key to reset the foreground and background colors to black and white, then fill the selection with black by pressing Alt + Backspace. Deselect it by pressing Ctrl + D and lock the layers transparency by clicking the Lock Layer Transparency button at the top of the layers palette. |
PppsssSSttTTt... by clicking the Lock Layer Transparency icon at the top of layers palette with our Background Square layer selected, we can effectively lock only the pixel area that actually contains information. This makes it easy to change color or add gradients without effecting the rest of the image. |
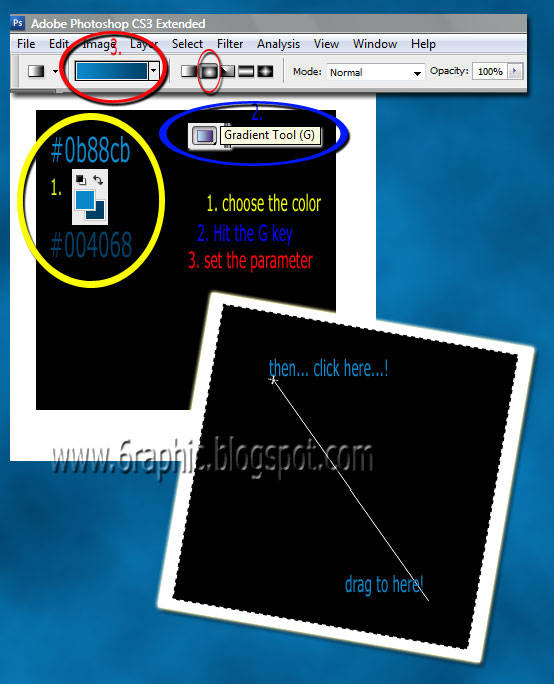
STEP 3 Lets go ahead and setup for the blue background gradient by changing the foreground color to #0b88cb and the background color to #004068. Press the G key to choose the Gradient tool, then from the options bar across the top choose Foreground to Background from the color picker and Radial Gradient for the gradient type. Now simply click a spot in the upper left hand corner of the box and drag at a 45 degree angle toward the bottom left corner to create a gradient that looks similar to the example. |
| Now's time to make a new glass of hot chick coffee... share with me then :) !!! OK... now... |
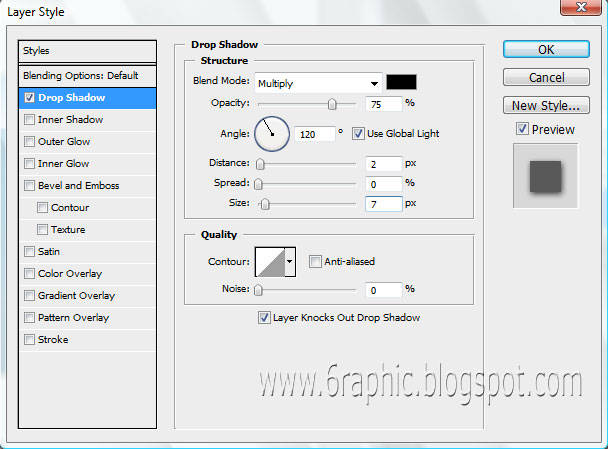
| STEP 4 We’ll add a drop shadow to the layer by Right-Clicking on the layer and choose Blending Options. Click on the Drop Shadow link in the left column and add the following settings then click OK. |
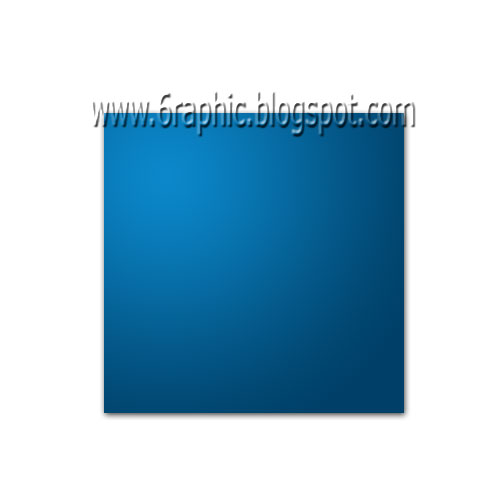
| Your file should now look something like the one below. is it??? |
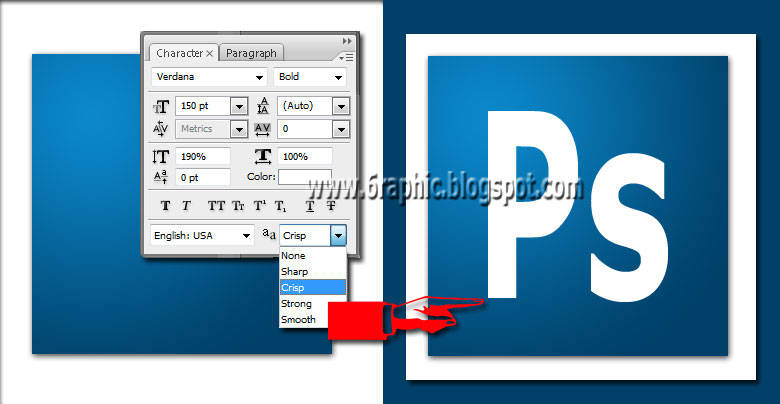
| STEP 5 Press the T key to call up the Text tool and lets go ahead and add our text with the following settings. |
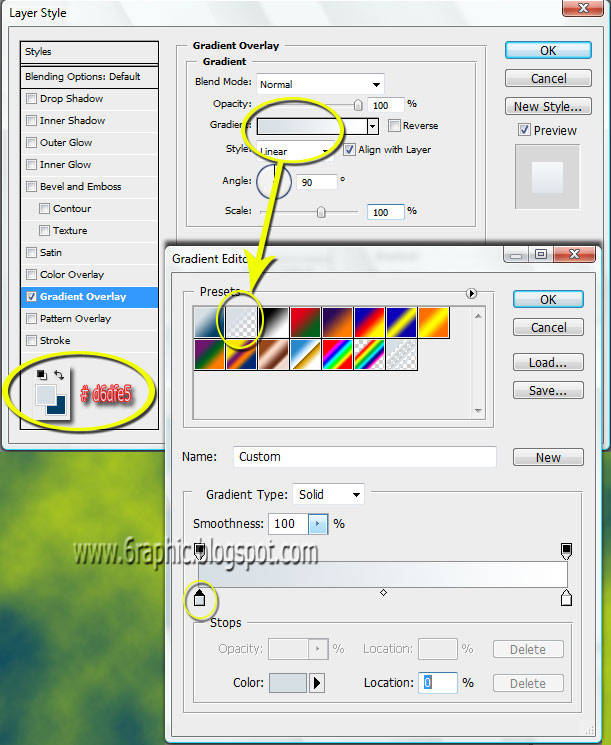
| STEP 6 The text also has a slight gradient but instead of using the gradient tool directly we are going to use the layer style called Gradient Overlay as shown below. Before I called up the Layer Styles dialog box though, I changed my foreground color to #d6dfe5 so that it would already be there for the layer style application. |
Technically now we are finished as far as a correctly built PS3 icon. Try all the variations or make up your own! Allow your own damn self to get excellent results even though you have no idea what you're doing. Well thats enough smoke up your ass for one day. Guys... My ass thanks you!!! Keep up the great work. And Enjoy!!! |
Related Topics :





Good morning, thank you for the visit, good afternoon with happiness, happy Easter. Hugs Valter.
ReplyDeleteaku pake PS3 juga, tapi ga bisa ngapa2in slain install brush :D
ReplyDeletebisa feendnya skarang, hehe :D
iya ada di bawah popular,
aku nyari2 di bawah halaman, biasanya kan blogspot suka ada "atom"nya tuh, tapi ini ga ada, taunya ngumpet di situ, huhuu..
Did you just say "smoke my ass up ??"
ReplyDeleteWew, tukan siomay,, hahaa ...
Kamu ma PS-mu ni mang satu hati,, btw aku suka banget ma poto2 hollywood kamu itu.. Bisa dunk kapan2 kupinjam ..??
wow.. english.. mumet otakku bacanya..
ReplyDeletehihihihih... :D
Berkunjung dan baca infonya, mudah-mudahan bermanfaat bagi banyak orang, sukses.
ReplyDeleteI Like Relationship.
om, gmn kabar ubannya yang cm 1 doang??
ReplyDeleteHeyy there genial!
ReplyDeleteU r really into photography yep.
:))
*smile
Wualah kang abot tenan halamane....
ReplyDeleteBut is very good tutor for my self...
Nice post
pengenya sih belajar photoshop tapi kalo pake teori alias buku malah kagak mudeng. hihihi
ReplyDeleteKeren oy,,,, thanx infonya
ReplyDelete@ all : segudang terimakasih buat semua temen blogger yang masih mau nengokin 'blog-gemblung' satu ini, juga sekaligus trmksh buat yg dulunya 'asik' skrg 'menjauh'... walau saya jujur gk ngerti kesalahan saya apa... (skalian muhun maaf dahh buat mrk, pink). Coupla kudo's comin' your way, in other words... thank you so much... mmmuacchhh...
ReplyDelete@ phiy : mksh udah ngingetin mslh feed nya... sukses buat phiy...
@ muzda : (luthu juga 'istilah' itu muncul di postingan ini, pink) gk nyangka aja klu Muzda bsa ada dmn2 di tiap postingan blog ini... speechless...
Guys... My ass thanks you!!!
Cool..
ReplyDeletehell yeah.. that's right... cool :)
ReplyDeletetengkyu iia :)
ReplyDelete