
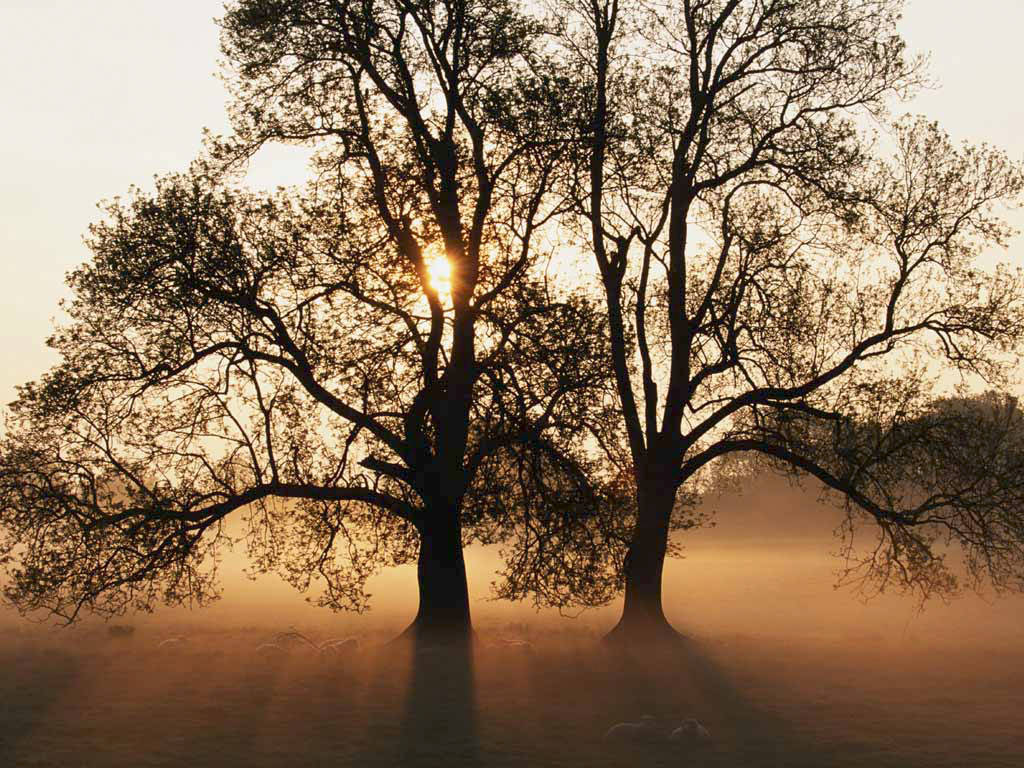
First, we have to make a "flat" reflection which we will distort later with the displace filter. In this example, we will treat the landscape as a single background object. This only works if the background is very distant.
Here's my huge beautiful image... mine??? Lol..
Samples!!!
Related Topics :
Air Brush Style Vektor with Photoshop Menu Navigation Abstract Background Rain Effect Matrix Effect Retouching Image Transparent Image
Other secrets here (Image Gallery)!
 |
Hit it to enlarge! |
| Determine where the horizon should be. Select everything above this line and copy it to a new layer. This will be the reflection layer. Extend the canvas downwards to make room for the reflection. Flip vertical and move the layer down to mirror it with the background. Near the horizon, almost 100% of the light is reflected of a water surface. At higher angles, the reflection component becomes smaller so you can see the color of the water itself. The color will be dark blue or turquoise if the water is clear. Of course, you can make any liquid you want by using another color. (Here I made it Red) |
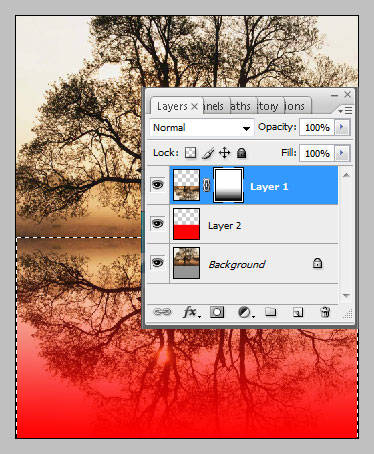 |
Create a new layer below the reflection layer and link it to the reflection layer. Fill the area behind the reflection with the desired color. (You can adjust it later with Hue/Saturation.) Add a layer mask to the reflection layer. Draw a white to black gradient down from the horizon to show the lower part of the color layer. |
 |
Now we can add some wind. (Remember about this trick?) Before applying the displacement map, we will use motion blur to simulate the effect of the waves in the distance. The blur distance depends on the size of the image and the wind effect you want to create. |
| Select the reflection layer and Ctrl+click the layer mask to make a gradient selection. Lock the transparent pixels by clicking the little checkerboard icon in the layers palette. 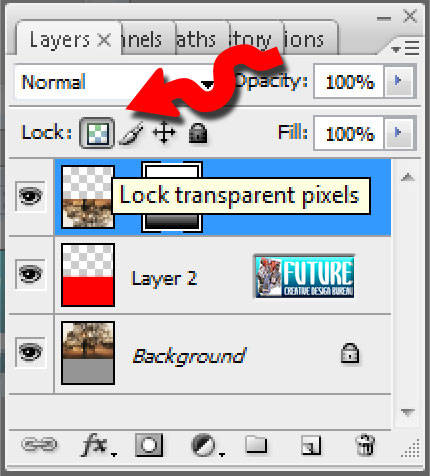 |
| Use Transform to scale the reflection layer to 400% in both directions. Ctrl + click on the reflection layer thumbnail to make the selection. Go to Filter > Distort > Displace ... Enter the amount of displacement. The horizontal scale value should be about 50% of the vertical scale. Also select Stretch To Fit and Repeat Edge Pixels . Click OK . Find the displacement map on your computer and click open to apply it. Deselect and use Transform to scale back to 25% . |
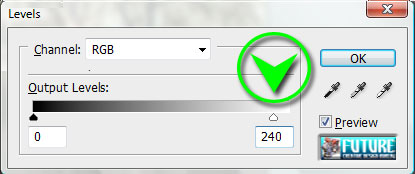
| Now it really looks like water. Notice that the layer mask is also distorted because it is linked to the layer. This causes the reflectivity to change with the angle of the surface. We will make some final adjustments to complete the image. Select the layer mask, go to Levels and change the white output level to about 240 to make the surface slightly transparent near the horizon. If needed, use the other sliders to further adjust the reflectivity. Finally, cut away the edges of the image if the repeated edge pixels are noticeable. |
| And there you go kids! Another fun Photoshop tutorial and a few more tools you’ve now got a little experience with. Great Job! |
Related Topics :
Other secrets here (Image Gallery)!


Wah, ini ternyata part2nya. terselip.. hahaha.. soalnya tampilan awal webmu membingungkan bro. :D
ReplyDeletekq saya bingung bacanya yak??
ReplyDelete@ thegands : iyah gan (juragan, pink) maklum pilihan template udah terlanjur jatuh sama yg satu ini :) gpp lah... mksh udah mo repot berkunjung :) ^o^.........
ReplyDelete@ Myryani : bhsa nya ngaco yah mba'?? maaf deyh... trs sambil belajar kuk :), pelan2 itu juga nulisnya mba, kang... eeehh... apa si?!?!?!
lama bgt buka blog ini bro..aku mpe di rubung lalat lho hihi..nice..
ReplyDeleteok boz....ini saya datangi lagi blog mu untuk yang kesekian x....
ReplyDeletekemana aja g pernah nongol di xxxxx xxxx (maaf sensor)
bisa aje cing :p
ReplyDeletenice content..and berkunjung sob...salam persahabatan...
ReplyDeletemaaf genial saya mampir lagi...saya blm tidur,saya kena piket mlm nih he..he..slm hangat ya dari singkep
ReplyDeletewah,, gila,, ane ketemu master juga ne..
ReplyDeletehalo master,, :D salam kenal dari Bloger Ndeso ne..
Weewww.... Ada teknik kek gini juga ya... Padaal Simple, tp hasil nya... Keereeen.... Thx buat info nya :D
ReplyDeleteide hebat bos
ReplyDeletelagi nyari kodok nih.tadi di minipost ada,tapi pas masuk ke sini kok gak ada....
ReplyDeletekeren deh...
ReplyDeletemakasi lessonnya ya!! akhirnya saya tau gimana bikin bayangan air pake photoshop.. makasi skali lagi!
ReplyDeletekereenn bgt nih ^^...jadi pingin buat jg
ReplyDeletekeren tuh
ReplyDeletekeren keren keren
keren keren keren
keren keren keren
mantaf...
ReplyDeleteFull images pak..
agak lemot di bukanya :-)
tipsnya selalu keren nih...
ReplyDeleteKeren euy, kapan kapan aku coba. Bookmark dulu ya...
ReplyDeletethnx for comin' y'all guys... realy appreciate it... maaf jika selama ini saiia blm sempet berkunjung balik... tp sebisa mungkin -pastinya- akan saiia lakukan demi kelangsungan blog ini juga :)
ReplyDeletearrivederci
ini mah udah keren blognya! aq ja masih belajar. makasi dah berkunjung!
ReplyDeleteHi, nice trick here. I'm use your trick, and surely the result is very good.
ReplyDeletewow...it looks amazing!!! the colaboration of those photos are perfect. when i saw the biggest photo firts, i think that a real photo. but after i read your post, wow...i can't say anything...It JUst AMAZING!!!
ReplyDeletereally nice =))
ReplyDeletethx for all guys!
ReplyDelete