
 Psychedelic Art is a form of visual art inspired by the psychedelic experience as a result of drug just like LSD or something, some people say.. "I'm high.." or something... Lol.
The word "psychedelic" according to wikipedia is "the embodiment of mind to describe the internal world and considered as a psychedelic soul.." In everyday conversation, Psychedelic Art refers to a movement of art in 1960.
Psychedelic Visual Arts is asserting in psychedelic rock concert posters, album covers, lightshows, comics, newspapers, published an unusual or let's say... underground thing.

I was trully inspired by that definition to write a tutorial in how creating a 60s Psychedelic Poster with Photoshop. Guys... Everybody makes their own fun. If you don't make it yourself... then it's not fun, it's entertainment. Lol...
Step 1
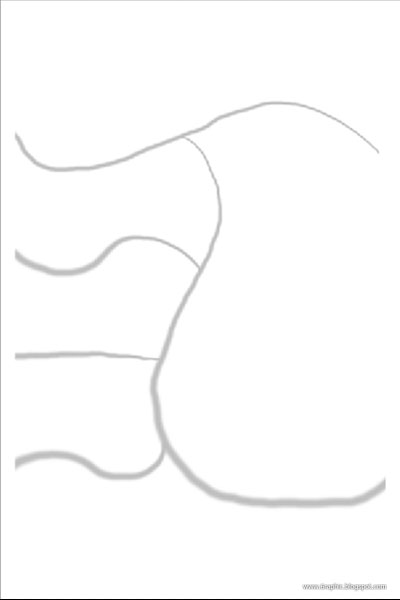
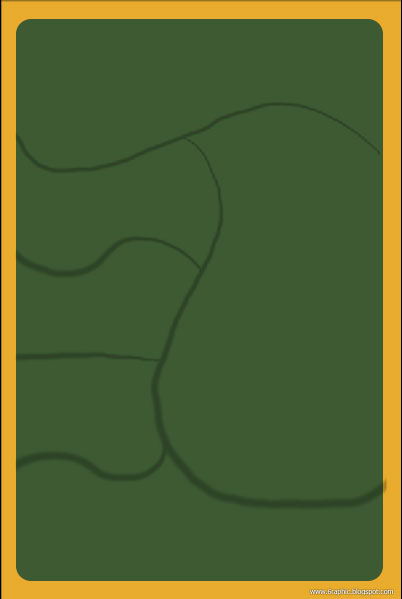
Create a new document (mine is 800 x 1000) then create a new layer called Guides, draw on your document some rough guides with the help of Brush Tool (B) like this..
Step 2
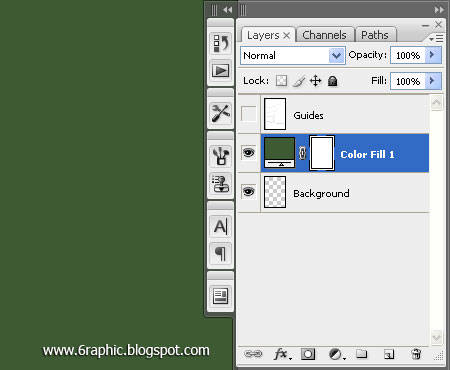
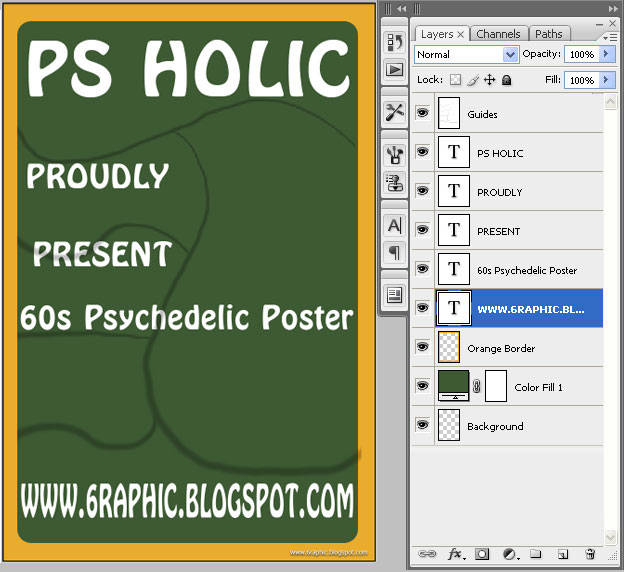
D'ya know about Solid Color? You can find this button on the nottom of the Palette Layer. Try to give a solid color adjustment layer above your Guides layer and don't forget to fill it with a deep Green or something.
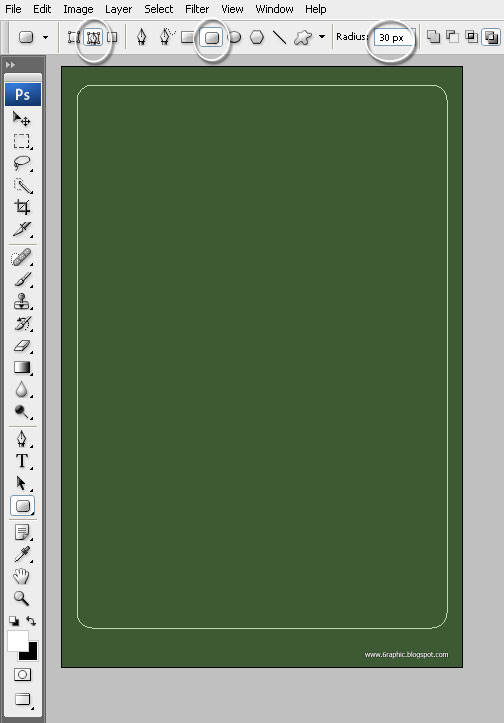
Activate your Rounded Rectangle Tool (U) and set the radius so that you get a nice rounded edge that you like. Make sure that you checked Make Work Path As. Click and drag to get your border. Done?!?!?
This is what I'm talking about...
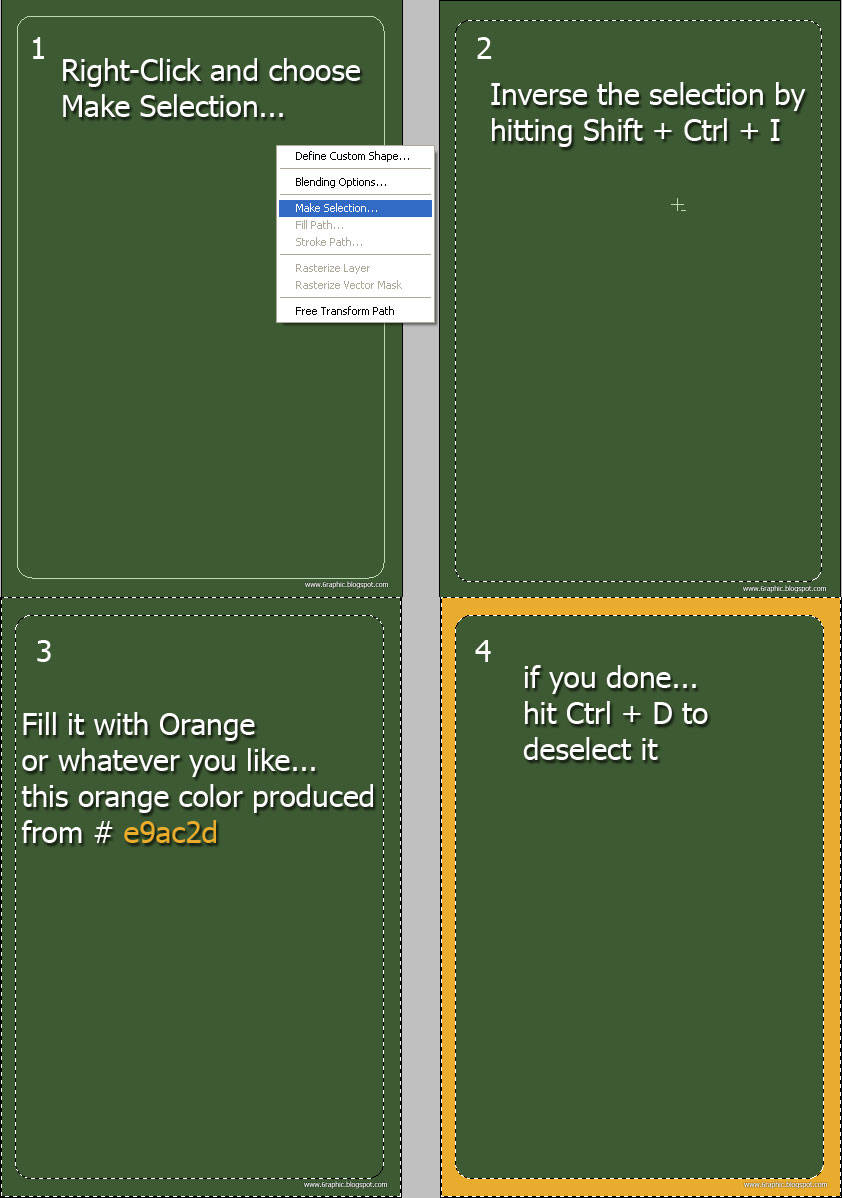
You gotta make a solid color adjustment layer and fill it with whatever you want.. Mine is Orange color.
Step 3
Now's time to set the texts on your rough design there. I used a 'special guests' font called Hobo Medium ATT and you can simply download that. OK... Now hit the T key to invoke Text Tool and click anywhere on your workflow. Type your text there. Hit Ctrl + T and scale it up so that it fits each part of your design. Press Enter when you're done!
Next... We're gonna change the text into paths by Right-clicking on the text layer and simply select the Convert to Shape from the Layers Palette. That will definitely turn your text into paths.
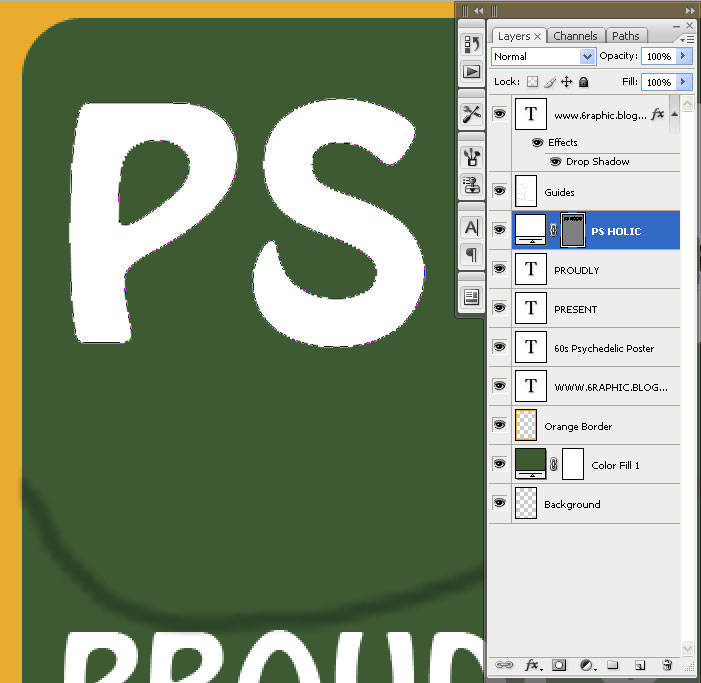
Voila!
Step 4
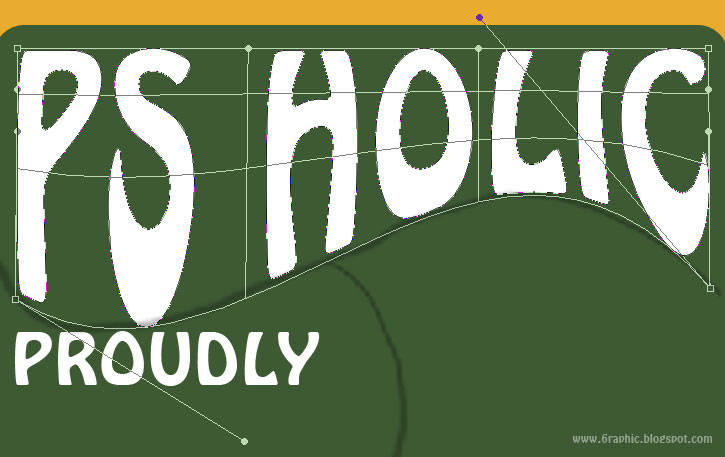
Go ahead to the menu Edit > Transform > Warp and I suggest you pick the wrap tool to get the text to fit the place you made. Obviously you can play around with it until you get some interesting result. Do not forget to repeat the step for all the text compartments.
Step 5
Now let's change the color on some of this text. Remember about my other tuto about Rainbow Text?!?!? Then you'll get this easily if you said so.
I guess it would be better if some of the text actualized with a stroke. Let's do that, pal. Go ahead.. Apply this kinda stroke to the other text. Here I change the Proudly and Poster layer blending mode effect by turn the Color Overlay off and turn the Stroke to both of them on. Then also, I did the same with the Fill the Opacity to 0%.
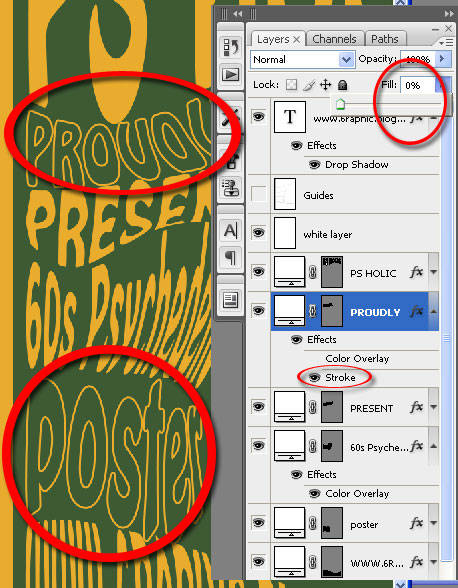
Pay attention carefully to the image above... I know that graphic above is lil' bit messed up... but I hope you can find what I meant there... :)
Step 6
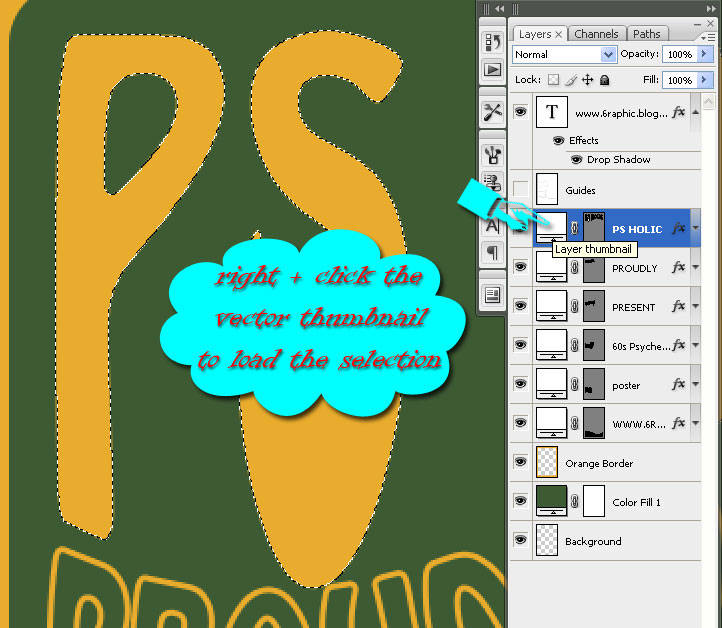
Load the selection of the PS Holic layer by Ctrl + Clicking on its vector thumbnail. Hit the M key to invoke the Marquee Tool.
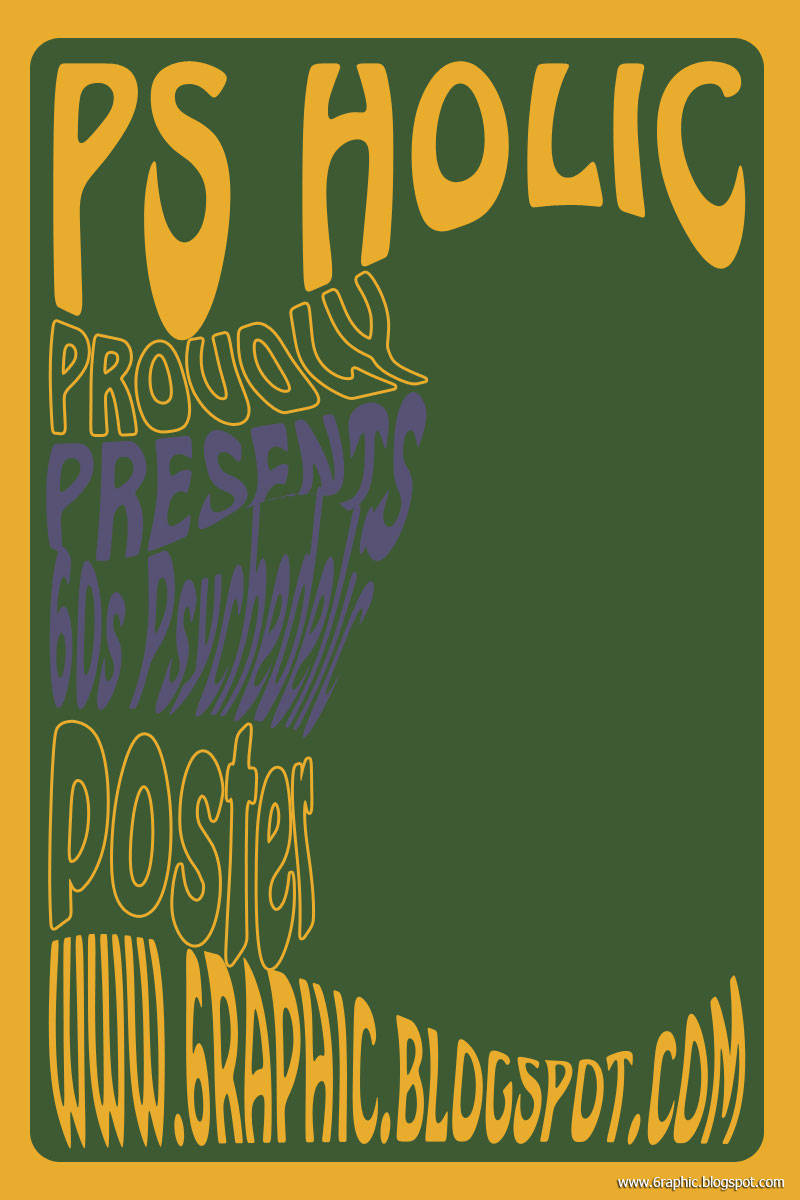
Hit the arrow keys to move the selection down and to the right. Now's the time to hit Alt + Ctrl + Click on the same layer thumbnail to subtract from the selection. Make a new solid color adjustment layer just above the original text and fill it with your secondary color. Set the Opacity to 50%.

Step 7
The thing that's trully gonna make this eyes-catchy and even more realistic is some texture. For that source, you can go search it through google or something with the keyword Paper Texture. I have that one that will do nicely and you can download it at the end of lesson here. What a nice guy! Lol... Copy it if you guys don't have the intention to google it, put it at the top in the Layers Palette and choose Linear Light as the blending mode with the Fill to 15 something something. Lol. Got it?!?!?!
Step 8
See...?!?!?!? What about the image used to it??!! Calm down...!! This is it. Move on to our image that will fill the rest of entire poster. I got a nice Christina Aguilera image for this. Position it just like what you want.
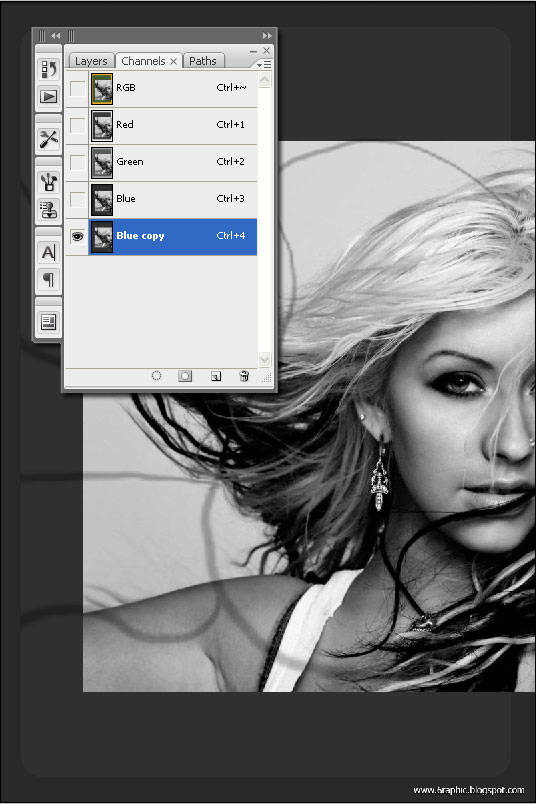
The image above tell us to duplicate the blue channel by dragging it to the New Channel button at the bottom of the Channels Palette. Still with the Blue Channel active, apply a harsh curve to it by pressing Ctrl + M or looks something like below.
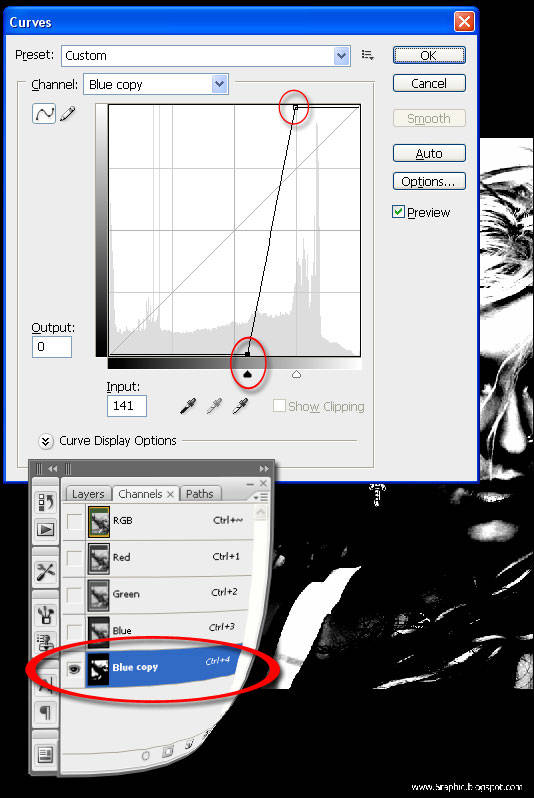
Same treatment with the red channel. Slow you down doods... OK.. Now invert each of the two new channels you made by selecting them and hitting Ctrl + I.
Step 9
Create a Solid Color adjustment layer and fill it with the lightest color like you used in the poster, Orange in this case. Back to the Channels Palette. Press Ctrl + click on the thumbnail in the Channels Palette to load the selection from one of the channels you made.
Create a new Solid Color adjustment layer above the previous one and fill it with one of the other colors from the poster, Green in this case. Do the same with the remaining channel that you created and fill it with the remaining color from the poster.

Now on each of the masks on the solid color adjustment layers, apply a threshold. Go to the menu Image > Adjustments > Threshold and drag the slider until you get the detail that looks good to you. Do the same for the other mask on the other color.
Step 10
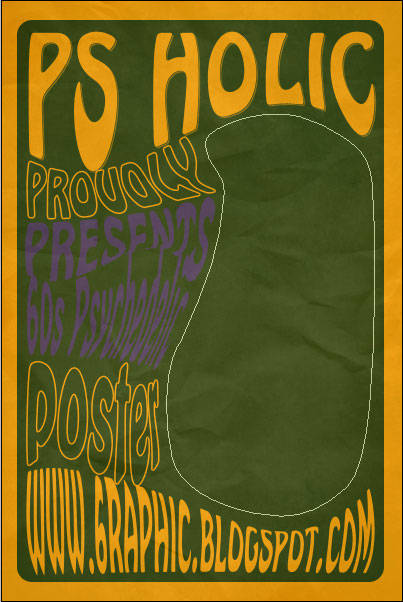
Geeez, let's get back to the poster. With this special Pen Tool (P), draw a path around the blank area of the poster. Make a new group by clicking on the folder icon at the bottom of the Layers Palette. With the path highlighted, hit the Add Layer Mask button twice to apply the path as a vector mask.
Conclusion
This is why I asked you to create 2 Solid Color adjustment layers in step 9. Here we go... drag them from the singer image over to the poster document and put them into the group that you just created. Scale the image to fill the space as you see fit. After all you've done, don't forget to remove the Guides layer from your Palette Layers bro... :)
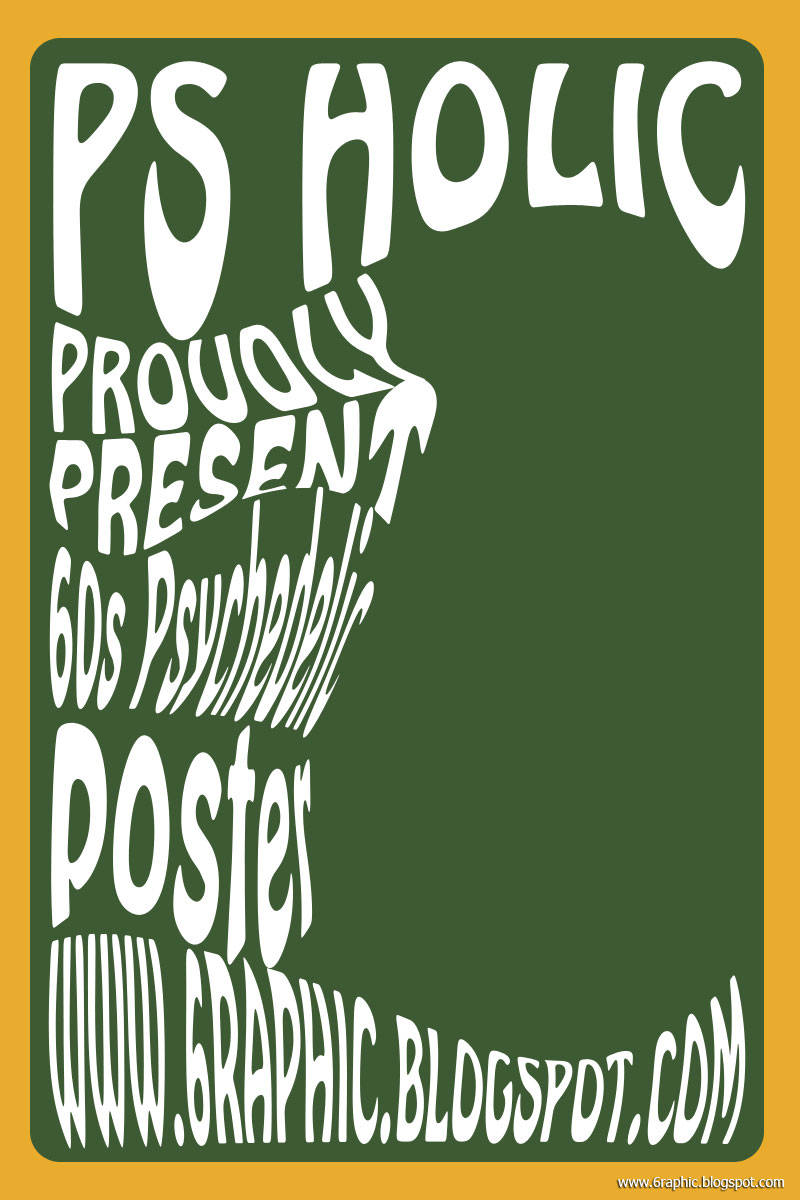
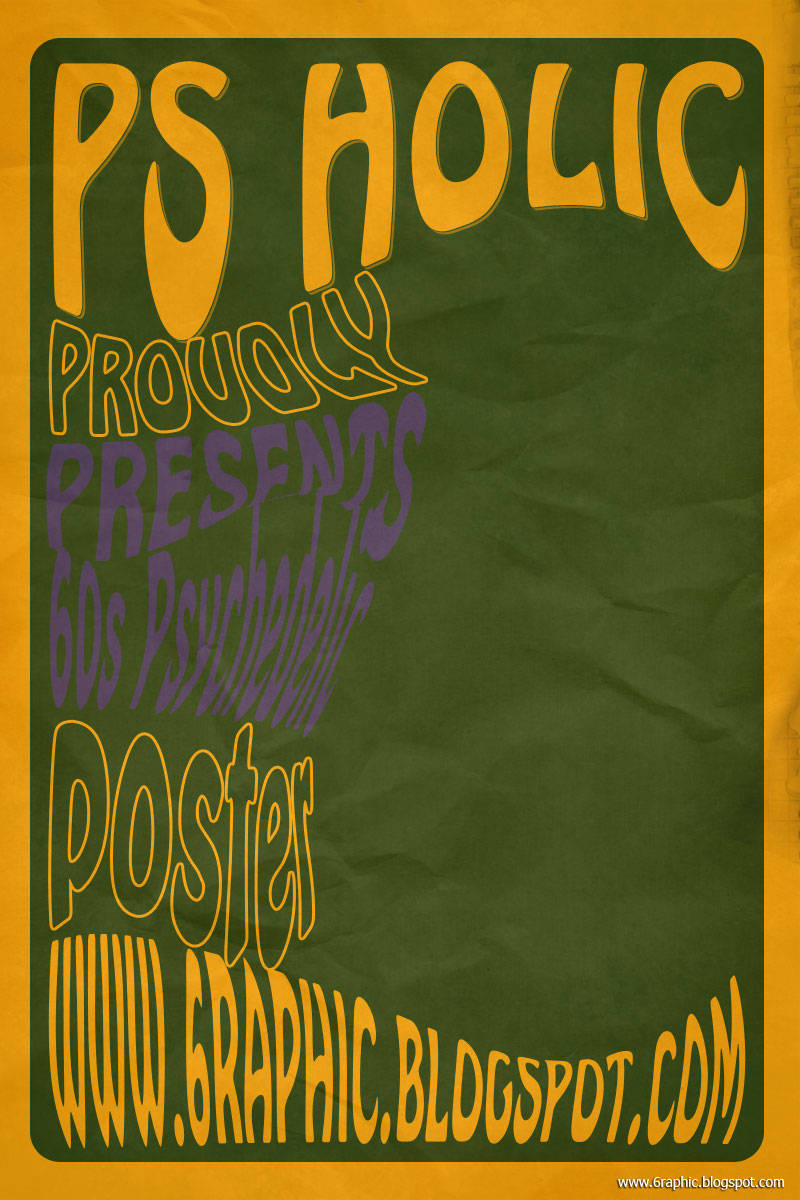
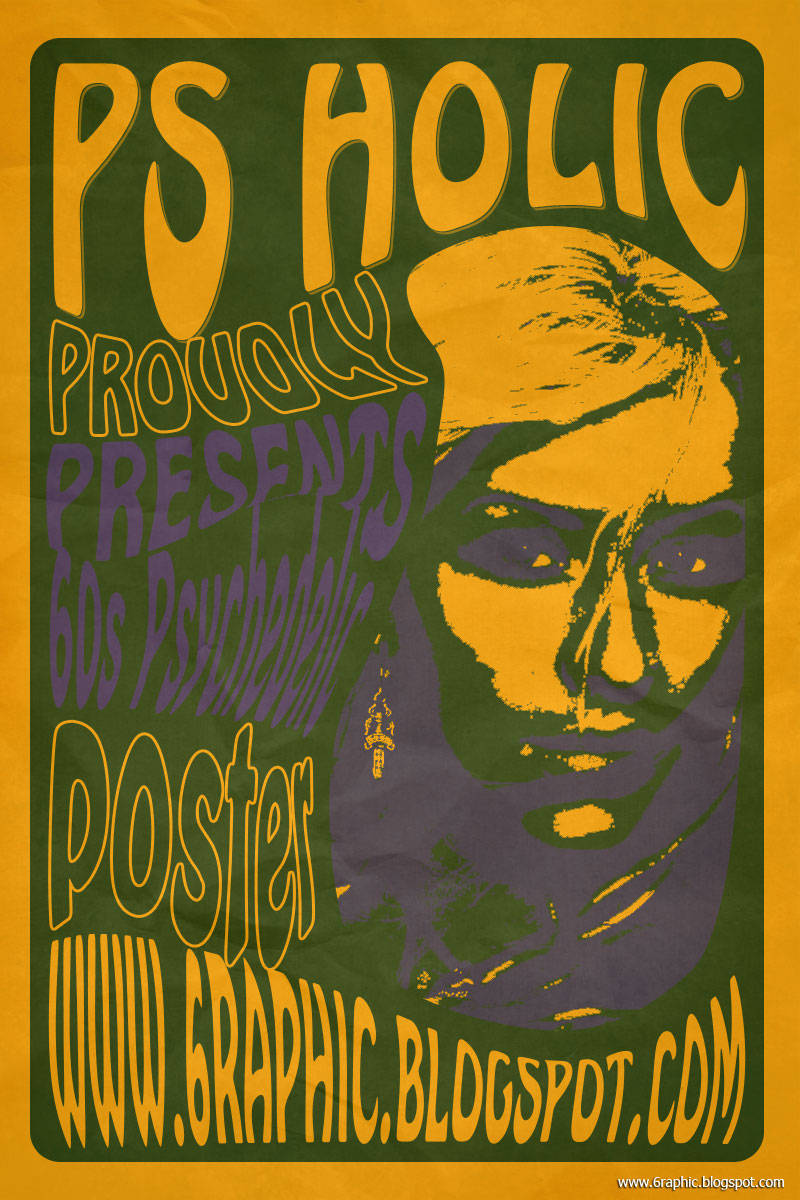
Our final 1960s psychedelic-style concert poster :
Have fun guys.
File to download
 |  | |||
Other sample :


Kunjungan balik gan. mantaps nih tutorial designnya. sayang photoshop cs2 tercinta sedang mengalami gangguan teknis. jadi belum bisa langsung dipraktekkan.
ReplyDeletetwo thumbs up!!!
sugoooiiiii ! ! ! ! mantep banget ! asik ya kalo punya skill untuk berkarya gitu, saya cuma ngerti musik :D tapi bikin lagu tuh gak gampang :( butuh berjam-jam (rata-rata 5 jam) untuk membuat lagu full instrument di guitar pro :D
ReplyDeletesukses terus gan !
huhuhu... keboo kagum, tp jg jd kecil hati.. saya cm pake cs1*nambahin angka biar keren.. selain itu cm bisa operasi crop ma kuas, hehehe...
ReplyDeletesemoga ini bisa jd ref keboo nanti kalo udah kenal fungsi potosyop + beli laptop baru... amiiiiin.. ^^
oooh, I´m sooo gonna try this out some day!
ReplyDeleteThank you sooo much for the tutorial :)
asyik kayaknya nyobain hal baru seperti ini.
ReplyDeletemakasih tutorialnya.
kapan bisa nyobain ya? tutorialnya sangat bermanfaat.
ReplyDeleteselamat menunaikan ibadah puasa juga ya.
Keren ni desain posternya...!!!
ReplyDeleteSaya suka dengan penggunaan warnanya!!!
Sukses selalu...
woooow
ReplyDeleteAku hanya manggut-manggut doang, soalnya pengetahuanku mengenai desain cetek banget. Yang penting tak bookmark dulu.
ReplyDeleteSubhanallah...
ReplyDeletewhoa!!
ReplyDeletegreat review ^^
Xoxo ♥
Pinkie Anggia
htpp://sugarpuff.jp.pn
gue mah cuma bisa manggut-manggut sambil ngelus jenggot kalo baca tutor lo bang.... top
ReplyDeletenice tips, tq 4 share
ReplyDeleteWah, mantab abis nich tutorial. Keren om...
ReplyDeleteit requires some hi-intelligent to eliminate mistake from one step to another if you didn't pay attention very much on this :( i've tried on my own but... not quite satisfied result i got :(
ReplyDeleteWah,..keren banget! Oh ya mengenai XML waktu download template tsb..mungkin akibat plugin di komputerr kal ya.
ReplyDeleteaku cuma bisa melongo sambil berkata ooooo, habis gak mudeng sih^^
ReplyDeletetapi ngeri jugaya kalao berbau underground gitu ;)
boleh dipraktikan nie..apa lagi bagi org2 macam aku,study sal komputer unformal saje.Thanks
ReplyDeletethx for this info...
ReplyDeleteyuhuuu...butuh seharian belajar kayak gini nih. Its helping frend!!
ReplyDeleteterimakasii buat semua yang uda mampir... secepatnya segera di bales ampirannya... jika ada permintaan yang blm terkabul mohon di maafkan... namanya manusia tempatnya khilaf :(
ReplyDeletewaw.. the great design tutorial.. sayangnya arfi kurang bisa desain.. hehe
ReplyDeletemet pagi..apa kabar?
ReplyDeleteAwesome!!
ReplyDeleteI love it :)
Next time i'll try it..
Much thanks for your sharing ;)
Xoxo ♥
Pinkie Anggia
www.sugarpuff.jp.pn
Woows nice post friend.. I like it. n godluck for u
ReplyDeleteterimakasii kehadirannya kawand semua :)
ReplyDeletegudlak to y'all :)
Smakin menarik aja info yg ada disini..
ReplyDeleteterimakasii kang atas kehadirannya :)
ReplyDeletewow... that's cool, dud. thanks 4 sharing
ReplyDelete...and thanx for comin' then :)
ReplyDeleteaslm wr wb
ReplyDeletenih blog makin keren aj hehe
skalian beli diblogku y sapa aj
bajuqueen.com
wa'alaikum salam wr wb... terimakasii mba'.. terlalu berlebihan tuh mba' pujiannya :) sukses buat jualannya iia mba' :)
ReplyDeletewah.. bagus banget tuh, ada cara2nya.. Dari dulu aku pengen banget belajar photoshop.. :)
ReplyDeletePosters with an artistic touch of art is very interesting. Thanks for your sharing.
ReplyDelete@ Lina Marliana : semoga bermanfaat mba' :)
ReplyDelete@ Herdoni Wahyono : thnx for comin' kang :)
i love this blog, very inspiring
ReplyDeleteganti fotonya pake foto saya mas :)
ReplyDeletefor the love of god i cant understand step 9 for the life of me. ive been trying on the same image for 1 hour and i dont get it. im following the steps but my image isnt anywhere close to the same. im using all the same color schemes just for practice but for some reason ive tried both sites with 2 different tutorials and step 9 i just dont get.
ReplyDeleteHelpful tip for "Step 10" that is very important and was left out.
ReplyDeleteWhen using the pen tool to insert your layers, make sure the tool is set to "Exclude Overlapping Path Area" which is located at the top of your screen in your pen bar settings to the farthest right.
If you do not set this setting, your inserted image will appear on the outside of your pen drawing, instead of the inside of it, like you want.
this took me hours to figure out toying with stuff, i hope this helps many people who gave up around step 10, i almost did.
if you have trouble adjusting your image in the space, select the move tool right click your inserted image within the space and choose its layer name, once you have chosen its layer name, you can now freely move the image inside your pen space.
aaaaaaaaaa.. pusing
ReplyDeletesaik bener. keliatannya mudah nih di coba.
ReplyDelete