Step 1 :
Open a new file by clicking on File>Open. Open your picture in Layer 1.
|
 |
Step 2 :
Write your text. Go to Horizontal Type Tool. Open the Characters window.
|
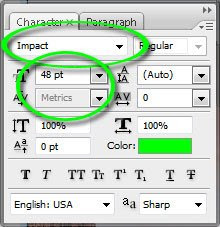 |
Go to Window > Characters. A screen will open. Select Font as Arial Black. Select Size as big as you can... I use 420pt just to make it more clear. We have written future creative design bureau... why is that so? Hell yeah.. yu guys should type that!!! Lol.. (kidding, pink)
|
 |
Step3:
Go to Layer Style. Then select Drop Shadow.
|
 |
Leave the default selections. Blend Mode - Multiply. Opacity - 75%. Angle - 120. Use Global Light - ticked. Distance - 5px. Spread - 0. Size - 5px. Click on OK. |
Step 4:
Now go back to 1st layer and duplicate it.
|
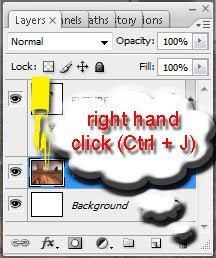 |
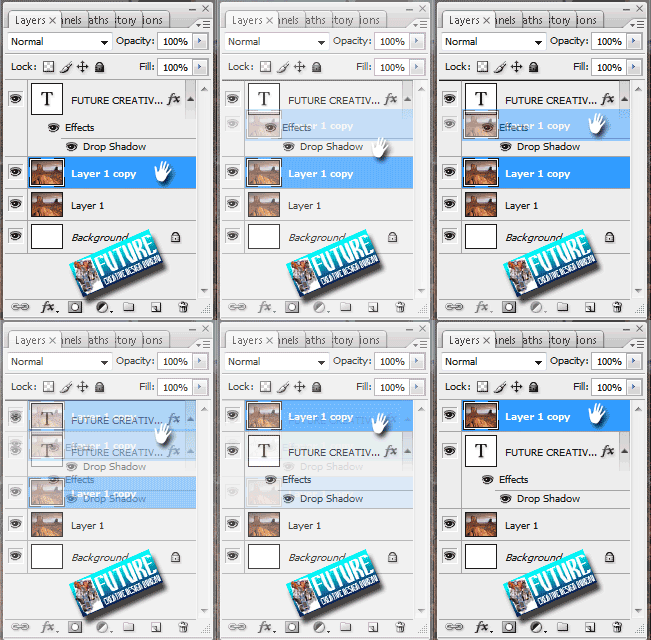
To duplicate a layer, right click on it. Select Duplicate Layer . By default the name of the new layer will be Layer1 copy. Put this layer on top of the text layer.
|
|
Step 5:
Now press on Alt with left hand. Drag your mouse with right hand in between both the layers. A black and half white circle will come between the layers. Now click on this circle. The Magic has happened.
|
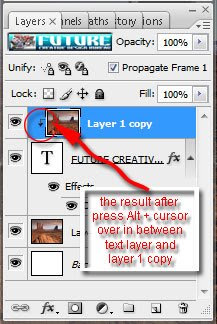 |
The Layer 1 copy will have an arrow pointing downwards to the text. |
Here is mine... what about yours?!?!?!
|
 |
In addition :
Remove the eye icon for layer 1 to make it invisible. See the magic. The text has taken the texture of the picture you have placed. You can move the picture around to see the text taking the different parts of the picture.
You can also keep layer 1 visible and move the text around with the Move Tool (V). You can place it wherever you feel it is best looking.
|
|
 |
 |
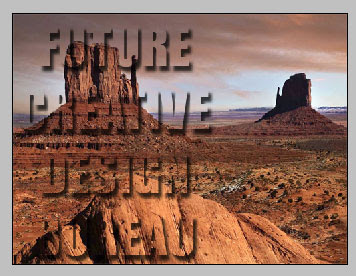 |
Your Superimposing picture in text effect is ready!
|
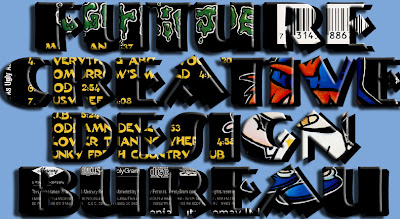
Other samples :
|
|
 |
 |
 |
 |
 Hi there again... how are you today?!?!?! Hell yeah hope you guys all the best, 'coz i'm not so good now, but it's OK... the smoke is running out.. what?!?!?!? that's right, but do not mention it, 'coz today, we'll gonna show you this... we'll gonna learn how to give your text a background of any image you want... any image!!! That's why i told you couple times that this such application, this Soto-sop... It's magic!


Good morning, thank you for the visit, afternoon of happiness and smiles. Hug
ReplyDeleteaduh..kyknya susah ya..blog yg canggih..
ReplyDelete@ Valter : Good morning to you too :)
ReplyDelete@ Mata Hati : sama dund kita sama2 gk ngerti sama yg satu ini :( :D:D:D
Rempong de ah...
ReplyDeletewaduh, kagak abis2 idenya neh bosss :D
ReplyDeleteselagi masih diberi kesehatan berlimpah... sebenernya, apa juga saya mo' postingin kang :(
ReplyDeletetp ya itu, otak ttp ada batasnya... :)
hehehehehe... lg bakar2 paus kang?
wahh.. Rinie nda bisaaa.. hehhehe
ReplyDeleteInfo yang menarik mas.
ReplyDeleteMakasih...
:)
as usual tancep sedooottttt! bawa ngacirrr!
ReplyDeletehaiyahhh, ikan paus iseng liwat...wkwkwkwk
ReplyDeletelagi edit themes ajah di blog laennya...xixixi...mumet soale css doang :D
maklum saya agak oon soal kode2an...wkwkwkwk
hi, there!
ReplyDeletethanks for the visit. it made me come to this cool blog.
nice tips you've got, bro.
unfortunately i don't have the software in my lappie, wanna have one, but expensive. *sob*
so, let me bookmark your blog URl to allow me remember it anytime i need your advice on photoshop and stuff. how cool is that?
cheers.
well, its like a water mark huh? very impressive..
ReplyDeletehoho.. keren bos.. mantaaab lah.. keep share
ReplyDeleteOh..Haha,I guess you can write on my cbox ^^ Nice tutorial! ;) I just came back from war (exam lol)
ReplyDeleteKeren ...
ReplyDeleteTutorialnya gamblang banget, jadi pengin nyoba nich :)
Thanks :)
@ Rinie : ya gpp Rien :)
ReplyDelete@ Humor Bendol : sama-sama kang, moga bermanfaat :)
@ Senoaji : bungkus kang :)
@ Gde Narayana : wahhh kebetulan saya mah gk ngerti masalah2 kode2 bgonoan kang :( musti banyak belajar lagi :) ajarin kang ya :) seeeppp...
@ Marshmallow : i have the portable version of it... wanna??? thnx for the bookmark... hope you enjoy visiting this blog...
@ The Gands : kebetulan banget, ternyata banyak yang menanyakan masalah 'watermark' thing itu kang... tp saya rasa gk sama kuk...
@ aa. Lil : makasih complimentnya kang :)
@ Justine : thnx for the reply... i'll come soon... realy appreciate it :)
@ Ari bicara : silahkan kang... di monggo...
wah saya gak ngerti kode2an... oon bgnt. hehe...
ReplyDeletebtw komenmu kok masuk spam ya??? hmmm... knp sebab??
bagian sebelah mana yang mengatakan ini adalah mengenai kode2 ribed ngJlimet kang???
ReplyDeletewah tutorial yang amat sangat berguna buat saya yang lagi mendalami bikin gambar. :D makasih tutorialnya mas
ReplyDeletehi genial thanks 4 visit my blog... tutorial berguna tuhhhh....good job..friends
ReplyDeletejadi pengen bikin yang bagus untuk tokoku...
ReplyDeletetutorial nya sangar2 boz...
ReplyDeleteharus banyak blajar kpada guru genial nih :)
very interesting post...
ReplyDeletethank you for sharing this ???
wah aku banyak ketinggalan tips..coz 2 minggu kemarin ngedrop alias tepar..semangat trus thx for the guide ..
ReplyDeleteMakin ciamik aja nih tutorialnya Boss?? hehehhe salut..
ReplyDelete@ all : makasih semua semua nya yang masih mau nyempetin masuk sampe ke dalem sini :) jadi terharu nihhh :(
ReplyDeletebang genial emang top deh pkokna....
ReplyDeletemacca ciii...?!?!? huehehehehehhe... gmn khobar kang?!??!
ReplyDelete