
 Do I should hire a professional designer to create my ad just for me? Hell No!!! Designing is a learned craft and of course I do believe that everyone has creativity. What most pro-designers (defined as anyone who writes an advertisement for now, lol) do is... dig and cultivate their insane creativity.
Really awesome ad designers aren't afraid to come up with dozens of bad ad ideas. I know I ain't good enuf on this, but still.. I ain't like that. I, my self know from experience that it's often the ones that don't work that will spark the idea for the one that will work.
OK.. Enuf with the chit-chat.. lmao! I'm gonna show you the untold part of how you create a customized product after coloring your bottle yesterday.. Still remember with the steps I wrote there?? There you go..!!!
Step 4 - Reflection
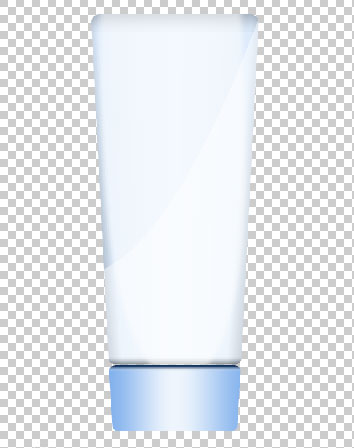
After all that base shading color for the bottle, I added another two shading layers but this time I'm going to be using a darker shade of gray with a color number of #a2a2a2.
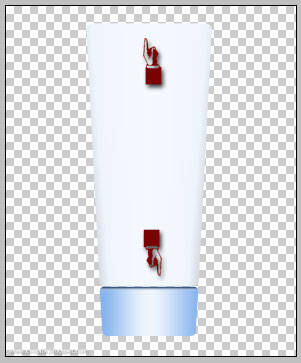
Including the top and the bottom part of the main bottle, I think.. the shading at the upper of the bottle would be a 'lil less dark in comparison to the lower parts. So I turn down the Fill Opacity of the upper shade more than the bottom to about 51%.
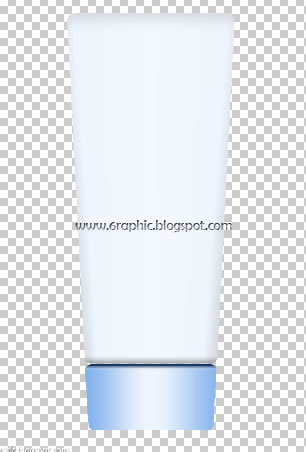
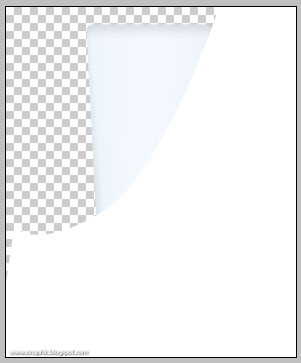
Next, I'm gonna add the white strip flow across the bottle as a reflection or something. First, add a new layer and name it as Whitestrip. Pick the Pen tool (P) to create a shape just like shown below.
Make sure it is curves down elegantly and smooth enuf to emphasize the contour of the bottle. Once you've defined it, Hit Right - Click and select Make Selection. Press Ctrl + Backspace to fill it with White color. Than press Ctrl + D to Deselect.
Warning : Press Ctrl + Backspace to fill the selection with White color will works properly if you see the Black and White as your Foreground and Background color (display) on the flying menu at the left side of your workspace of Photoshop.
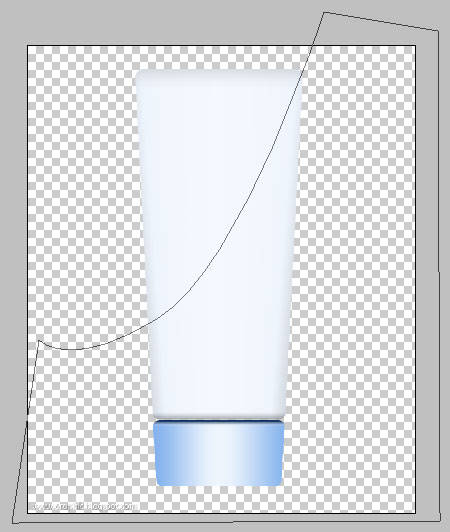
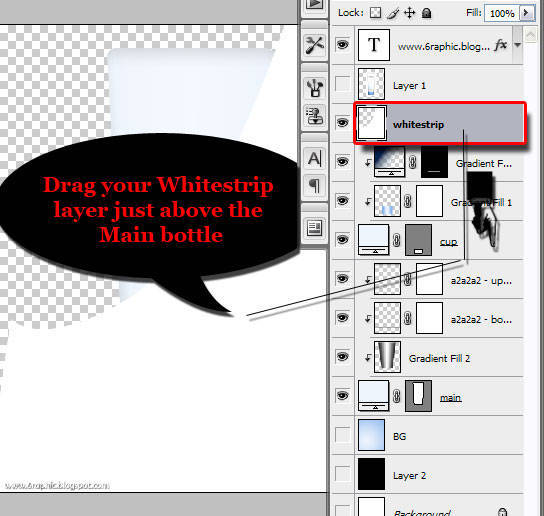
OK.. Unless you arrange your Cup layer and its contents below the Main layer, you'll find the chaos on your image. Don't worry.. it's all about how to arrange it into each place well.
Drag your Whitestrip to above the Main bottle (above the Gradient Fill and the Fill color adjustment #a2a2a2 bottom and upper) like I show you with this chaotic screen shot, lol.
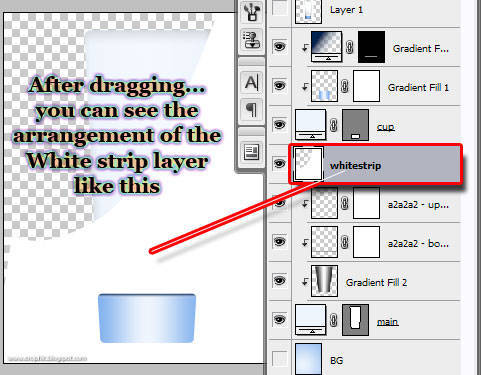
Now you know exactly how your arrangement layer is after you drag the Whitestrip.
Next.. you're gonna need to do the Clipping Mask step on that layer to hide the unneeded part of the white color covered the Main bottle. Look at all my layers there!

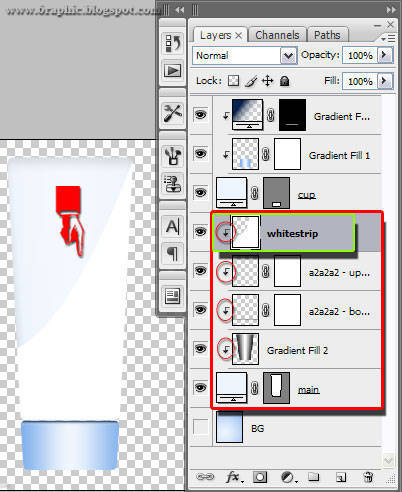
After doing that favo step (Clipping Mask), turn down the Fill Opacity into your need :) Mine is around 30-50%.
Alternative : You can simply change your Blending Mode without changing the Fill Opacity, change it into Soft Light.
Got it not?
Nope?!?!? You should then read first the 1st, 2nd, and 3rd steps of this Tutorial to complete it!
To to to be or not to to to be contifuckin'nued..?
Complete tutorial : James Pond's 1, James Pond's 2, James Pond's 3, James Pond's 4.


waduh...potosop.. jadi makin sering aja nee berkunjung ke mari..
ReplyDeleteemangnya knp dngan photoshop?!?!
ReplyDeleteduh, ternyata ini tutorial photosop ya .......
ReplyDeletehiks....bunda menyimak aja deh
krn gak ngerti blas....
salam
iia bunda.. gpp ko'.. seneng bunda bisa mampir lagi di sini.. :)
ReplyDeletephotoshooop... pening saia dengan detail-detailnya..hahaha..
ReplyDeletetapi keren ah, itu produknya.. ponds yak? saia pake soalnye.. #inibukaniklan :D
dua orang salah produk :p
ReplyDeleteane g punya komputer sob.. Jd cukup nyimak aj yak.. Hahay!
ReplyDeleteSekalian silaturahim :)
gpp kang.. makasii uda mau mampir silaturahmi :)
ReplyDeletemalam mas owner... komentarnya sudah saya tanggapi di http://coretrizal.blogspot.com/2011/01/dunia-teknologi-membuat-manusia-lupa.html
ReplyDeletesalam blogging ya mas
salam blogging juga kang :)
ReplyDeleteThank you very much my friend Genial for your visit, happy new week with peace and happiness. Hugs Valter.
ReplyDeletethx 4 u..
ReplyDeletenice tuto...
Pons ini aq suka karna tiap hari aq pakai nyaman di kulitku hehehe
ReplyDeletemancaap design nya...
ReplyDeleteWah, aku nggak terlalu paham dengan yang namanya photoshop. Kalau dasarnya aja sih ngerti aja. Tapi kalau sudah yang agak rumit, aku nyerah aja deh
ReplyDeleteaduuh...ampun dech..kalo pake basa londo..kalau tutorial...he.he.he...
ReplyDeletewah kebetulan sekali, saya lagi nyari2 tutorial photosop.
ReplyDeletemantap nih!
salam sobat
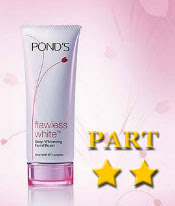
ReplyDeleteberkujung kesini jadi tahu tentang photoshop,tadinya saya kira ponds,lihat gambar atas.
sentuhan romantis, he he.. Nice tips buddy, thanks :D
ReplyDeletewaaah bermain dengan potoshop memang mengasyikkan niiih..... mantaaab.
ReplyDeletetrims yaa atas ilmunya, sukses selalu n tetap semangat
jadi pingin belajar photoshop:)
ReplyDeletewaduh susah kayknya buat itu sob
ReplyDeleteyes nih
ReplyDeleteOh ini tentang photoshop ya...?
ReplyDeleteI'm coming... :D
ReplyDeletegood job, genial. And this one "To to to be or not to to to be contif**kin'nued..?" make me laugh :lol
harus pake google translate saya he he hehe
ReplyDeleteOh, so it is the part two. I thought that it was de ja vu, hehehe. Nice info bro. When I need it, I will visit this to practice it. Thanks
ReplyDeleteyah baca2 dulu aja
ReplyDeleteSiip!!
ReplyDeletePhotoshop!!
Pond's..
Flawless white lagi,
Aku banget!!
terimakasih Infonya,mas
kunjungan balik..
soal desain-mendesain, penegetahuan saya bener2 minus, mas. terus berkarya menghasilkan produk2 kreatof. salam sukses.
ReplyDeletelike it. mantap... :)
ReplyDeletemantaf mas, pake reflection..
ReplyDeleteo iya, makasih tadi kunjungannya..
salam kenal..
makasih share photoshopnya, banyak2 buat triks n tips jadi pingin berkunjung kesini,
ReplyDeleteoh, bisa di edit kayak gitu yah ternyata..
ReplyDelete=D
mantap sob tutorialnya memberikan ilmu kepada yg belum memilinya,disini memang anda selalu memberikan ilmu salut buat anda sob,terima kasih banyak.
ReplyDeleteSalam
as usual,,,U'RE REALLY GREAT FOR DESIGN!! KAKKOIIIIIIIIIIII >.<
ReplyDeletei got it
ReplyDeletei'll try my best
mantep deh...!!!
ReplyDelete^_^
(gak bs komen coz gak bs photosop)
tutorialnya lengkap dan jelas, dan saya tahu capeknya bikin tutorial yang lengkap ha ha :D
ReplyDeleteterima kasih mas
Makin keren aja ni tutorial photoshopnya..
ReplyDeletemaafkan lama tidak kesini sob,
semoga kabar baik ya.
nice tutorial bro :)
ReplyDeleteseneng kesini lihat hasilnya bagus-bagus, tapi aku ga bisa :(
ReplyDelete@ Cmte. Valter : peace and happiness Sir :)
ReplyDelete@ sibutiz : makasii kang :)
@ Anisayu : tp yg nii pasti beda mbak :p
@@ mbah jiwo : mancaap di tanah kang iia?!?! :p
ReplyDelete@@ Ifan Jayadi : gpp kang.. santai.. yg penting nyantai kek di pantai :p
@@ Fajar : iia nti di buatin khusus yg pake bhs mongolia kang iia.. hehehe kidding.. ntar juga ada yg bhsa indonesianya kang :) mohon bersabar ajja kang iia, doain saiia nya sukses ngono .. :p
@ ll : saiia gag bisa bls satu satu semuanya di sini iia akang mbak.. mayan cape.. nti di balesin satu2 di tempatnya masing2 dee.. promise :p !! makasii buat semua yg sudi mampir ke sini :)
ReplyDeletehmmm I love it.... Asyik uy ada tutorial ttg Photoshop,, numpang belajar ah...
ReplyDeletemantab lah artikelnya sob :D
ReplyDeletecooll tutorial.... msh belajar juga neh
ReplyDeletewow... very good tutorial!!!
ReplyDeletesimpel ya caranya...
Hwaa ini keren banget
ReplyDeleteapalagi produknya yg ini
hahaha
keren bos
♥♥
Pinkie Anggia ☺
http://pinkieanggia.tumblr.com
aaaahh dari dulu pengen bisa jago sotosop, eh photosop mksdnya. hehee.. tapi uda nyoba2 tetep aja ga mudeng2.. huhu
ReplyDeleteseneng sih belajar, tp skrg ga sempat lg. sibuk kerja..
ReplyDeletebut nice post.. :)
How to Convert Youtube Videos to MP4
ReplyDelete