
 I recently finished a How To Create An Effective Advertisement post for some folks where I had to take a kind of long explanation without giving them vector piece of stock of art or something and even customize how it looks like in Photoshop style of magic, lol.
Doods.. This tutorial is some basic shape transformations, using the Rectangle tool (U) with color fill or adjustment layer to create a fresh-looking stuff to achieve the final result. Fellas... Just sit back, buckled up.. kick your feet up and watch the magic I'll give y'all. Let’s get started!
Step 1 - Background Preparation
I’m working with a 580px wide and 700px height at 72ppi document.
For a print quality file, 150-300ppi is just great, but still.. it depends on your printer’s desired file size.
Use the Gradient tool (G) for the next step and set it up to Radial Gradient, as shown in the image below..

Apply then the #eef5fd for your Foreground and #84b2ed for your Background.
Step 2 - Rectangle Tool Implementation
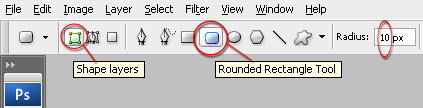
Now... on two separate layers, create two main shapes using Rectangle tool (U) you've set up earlier (see the image above) and don't forget to name each.. (1) Main, the body of the bottle shape layer and (2) Cap, for the cap or head of the bottle.
My both shapes above created by repositioning the upper side of the Main layer as well as the Cap layer by Transforming the Perspective of each shapes wider.

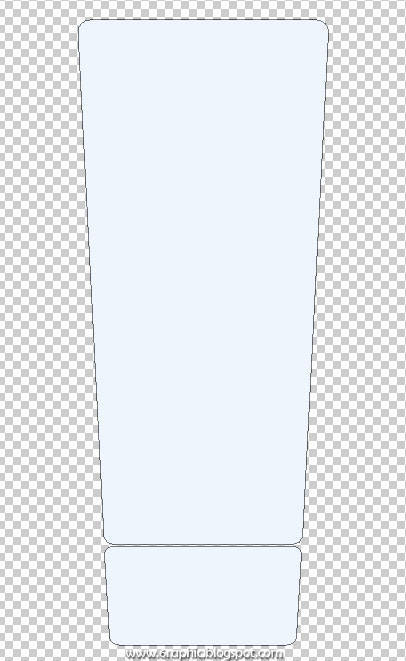
Step 3 - Coloring (Fill or Adjustment Layer)
Now we're gonna add the color and also the shadings for the main shapes we made, both of 'em. First we should activate your Main shape or Cup shape by clicking on their layer (you just pick one of 'em, lol)... (I just couldn't think of anythin' funnier to put there.. Sorry).
After that, click the Create New Fill or Adjustment layer button at the bottom of your Palette layer. We will add a gradient color to cover the shape. Choose Gradient.. there is little pop up windows come up, set like the image below..
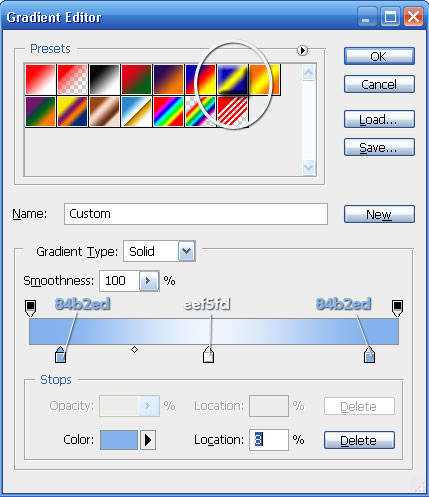
The color combination I put on the box is the color I used on the Step 1. It's all arranged with that way (...of life, again I just couldn't think of anythin' funnier to put there..) just because.. we wanna make the cylindrical illusion in that shape.
Rasterize that Gradient fill layer by Right+Clicking on its layer, than hit Rasterize Layer. Hold on..! Why you should do that? It's because you will rotate the Gradient Fill layer and fix it with the Cup (The Cup of the bottle). Just because I'm so lazy on adding it by way a selection or something like that (or just because I’m just that kind of guy).. so I lose my mind with this?!?! Lmao! You should Rasterize it first so you can edit just like what you want :p (Did you notice.. how many Rasterize words in this paragraph???)
OK..(still.. no better joke) Take a breath for a moment guys...!
While you're done preparing your hot delicious coffee with a djisamsoe or something, sit back and complete your work flow... Now.. I'll give this two alternative in coloring. First.. You can use your Brush tool (B) set to a size of about 90px, color the Main shape (the bottle layer) you made with this two color #252525 and #FFFFFF, and change the Blend mode into Hard Light, and turn the Fill down into about 37%..
Or you can add a New Gradient Layer above the Main layer to cover up the bottle just like I did with the Cup.. Here I use the second (just because that's the point.. that what I', talking about) to apply the color (of course with the same sets as you use for the Brush's).

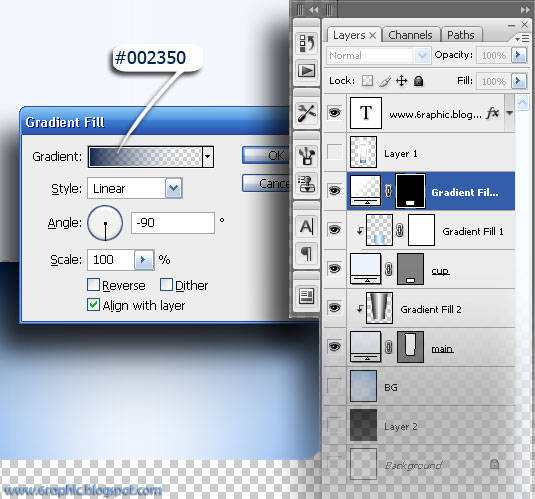
Let's get back to our Cup.. we have something to do with the gap between the Cup and the Main bottle... First, Ctrl+click your Cup thumbnail to invoke the selection of it. While the selection is active, click the gradient layer above the Cup layer, we're gonna add another Gradient Layer above it. Done? Ok, don't go anywhere, you should do click Create New Fill or Adjustment layer on the bottom of your palette layer, then choose Gradient! Fill it with #002350 and transparent, Style = Linear, Angle = -90. Leave the Scale 100% and Check the Align with Layer.
Then your product will become like this...
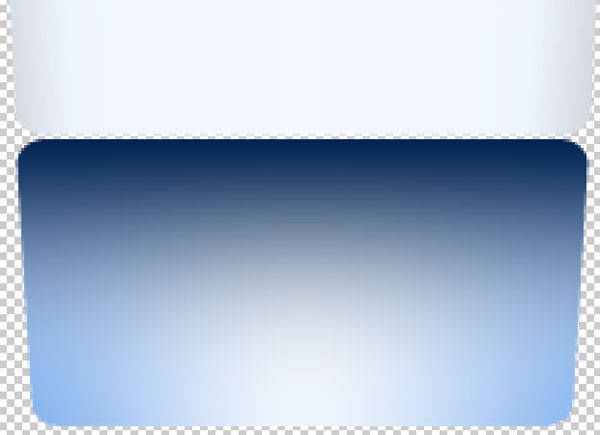
That's not good, is it?!?! Who's the one that agree with me... it's not good enuf! Raise your hands. lol!!! Let me tell you this.. you'll need this to fix the prob.

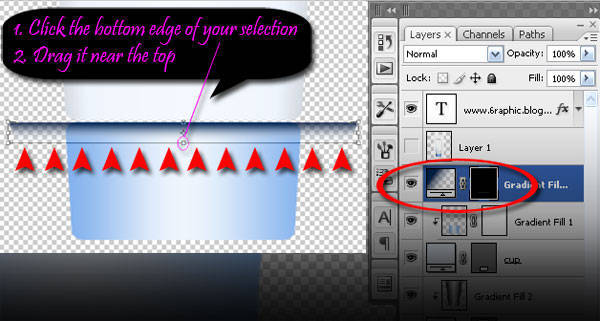
Click Ctrl+T to invoke the Transform tool.. Drag your bottom Gradient Fill (you've created above the light blue gradient) just like I show you here.. watch this carefully!!!
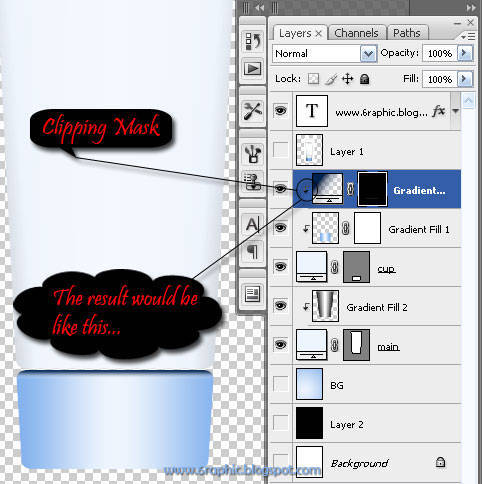
Put your Cursor between Gradient Fill1 and Gradient Fill 3, hold it there, press Alt.. than you'll see the icon of people wearing headset, lol (shit.. I dunno what to say doods!!!) D'ya know what I mean?!?!
That's what we called Clipping Mask fellas.. Take it easy! If you see that damn ghost, Hit your cursor (click it)!
Your image would look like this.. If it doesn't work..?!?!? Repeat until you get that, lmao!
To be Continued...
Complete tutorial : James Pond's 1, James Pond's 2, James Pond's 3, James Pond's 4.


seandainya pake bahasa indonesia..
ReplyDeletepusingnya jadi g dobel..
nii uda saiia pikirkan masak2.. sabar ajja mungkin nanti saiia akan buat satu blog lagi khusus versi bhsa indonesianya kali iia... soalnya klu di sini saiia rubah semua.. saiia masih sayang mbak :( gpp kan ?!?!?
ReplyDeletemakasii iia kunjungannya.. sukses buat bisnis ori*nya :)
ternyata lebih asyik melihat hasil yang sudah jadi daripada melihat gimana cara membuatnya.
ReplyDeletekalo kata @zanottama, pusingnya dobel, tapi buat saya pusingnya 7 turunan 7 tanjakan dan 7 belokan untuk bisa ngerti :(
met malam..birunya keren
ReplyDeletewah....kalau yang kaya ginian temen saya nih ahlinya....desaign mendesaign..he.he..kerenzz...
ReplyDeleteWow, u wrote it in English. And of course, a little bit make me confused coz im not good in english first and also i dont know anything about photoshop *lol
ReplyDeleteand about the pict above (ponds), doest it has been created by you? i love it :)
Nice blog..keep it up. God bless u..
ReplyDelete"pangeran datang. bukan dengan kekuatan tapi dengan senyum" folow balas folow Linkoeh juga pasng yokay....
ReplyDeletepulang jum'atan langsung mampir ke blognya sahabat
umpama rumah situ dket sini.. pasti tak mampiri, soale aku paling doyan otak -atik gituan...
ReplyDeleteThanks for your support.... nice post...thanks
ReplyDeleteMakasih tutorialnya kang..
ReplyDeleteAyo Raih 1 juta pengunjung, caranya sangat mudah.
ReplyDelete1.Klik 6 ads
2.Catat kode yang muncul
3.Masukan Nomor kode pada kotak yang tersedia
4.Isikan Nama, email,URL Anda, dll
5.Submit
6.Konfirmasi email,
7.Catat account dan paswword,
Jangan lupa ajak 10 teman melakukan yang sama...thanks
I like working with photoshop too, nice tutorial.
ReplyDeleteThank you for join Blogger Challenge 2011, hope u r posting much better until end off 2011
backgroundnya pas mantap
ReplyDeleteaku bikin ga bagus
ga bakat neh aku
hahaha ngakak baca komen raditha
ReplyDeletememang lebih asik liat hasil yg udah jadi ya
dan di balik hasil yang terlihat bagus itu ternyata prosesnya begitu njelimet
tapi bagi peminatnya tentu prosesnya pun terasa asik
keren mas!
It's a good tutorial, bro.
ReplyDeleteI will tell my brother about this since I am not familiar with this stuff. Usually I use photoscape, it works for me, simple application for a beginner like me, LOL.
mantabs nih tips photoshopnya,,,,
ReplyDeletewaah pantas aja yaa..kalau udah lihat di majalah
ReplyDeletesebuah prosuk jadi terlihat ngecling
ternyata di PS dulu
alangkah lugunya saya :)
eniwy..ada 4 kata Rasterize yg dipakai
masih bisa diterima koq hihi
menikmati hasil akhirnya lebih memuaskan :D
ReplyDeletekeren banget tutorialnya
ReplyDeletelengkap banget.. lumayan buat nambah ilmu
thx ya
Walah... pake bahasa linggis. Susah euy...
ReplyDeletegood trick , thanks for your tips :D
ReplyDelete@ all : thnx for coming.. really appreciate it.. maaf gag bisa blsin satu2 di sini, tapi saiia berusaha bales di rumah akang mbak semua iia ;)
ReplyDeleteiklan ponds nih :D
ReplyDeleteditunggu lanjutannya, untuk sitti iklannya bisa diatur warnanya seperti adsense
untuk harga perklik juga mirip adsense, tergantung dari "bidding" advertiser,
ini bukan postingan berbayar kan?
ReplyDelete@ r10 : salah akangnya weee.. buakn Pond's kang.. :(
ReplyDeletemasa sii kang bisa di atur.. ko' semua user yg saiia temuin keknya sama semua warnanya?!?!
@ TUKANG CoLoNG : bukan kang :(
Terimakasih banyak untuk informasinya ... sangat berguna sekali ... kalau ada waktu lowong mau mencoba juga nih ...
ReplyDeletemonggo kang monggo :)
ReplyDeletewaduh..lumayan pusing juga tuh,soalnya tidak lihai juga nih bahasa inggrisnya,bolak balik buka kamus hehehe..
ReplyDeletebtw thanx infonya,nanti aku coba..
salam..
@ nchie : pelan2 asal kelakon jeng :)
ReplyDeletemangtafff
ReplyDeleteikut-ikutan membuat ah
monggooo.. hope you like the output :)
ReplyDelete**mampir nengokin genial
ReplyDeletesory oot..
ihhh,,, makin keren aja tekniknya (tapi makin bingung) hahahhahaa
ReplyDelete