
In the middle of the headache... when my ads goes anywhere... forcing me to make this learning tools in Photoshop, but it happened without insert the header with Menu Navigation... This time we're learning to make the header with Menu Navigation, the fact that this one requires an enhancement, sotosop cannot allow this for the web, but also requires the enhancements such as FrontPage or Dream Weaver... so ... This image can't stand alone without the presence of that application i told you before... This simply making a rough menu nav...
There's no need good skills to do that... just drink up your tomatoo sauce, what ever! The Sotosop continue to open, create a new work sheet with the same size as you've ever made just like in this tuts... here you are, participating to learning this tools, it's about 1/2 of the header itself ...
The steps are ;
1. Choose Rectangular Marquee Tool (M)
 make a box just like the image below said :
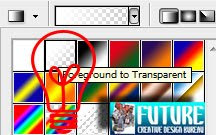
2. Pick Gradient Tool (G), set the property like this : Foreground = #F2CB0E and Background = #EF9801 do that scratch from the up side into the down side or the contraire, what ever you wanna...

To make it more beautiful, use the Polygonal Lasso Tool (L) cut a lil' of the corner side of that menu nav :

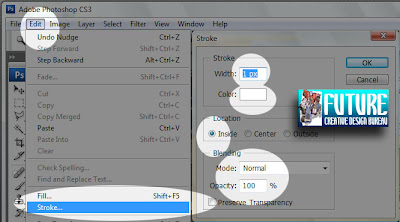
3. Go to Menu > Edit > Stroke, Fill the Color with white > #FFFFF (again and again i told you that the color thing is up to you guys), watch the pic here :


Now we'll bring he effect into that image, lightning strike... apply this :
4. Choose Rectangular Marquee Tool (M) :
5. Pick Gradient Tool (G), set the property just like this : Foreground = #FFFFFF drag the mouse from upside into downside... Repeat that to get the no4 and 5...

Well..???


Well..???

6. Hit New Layer, pick Line Tool (U)  , set the parameter : Foreground = #000000 again you should do the drag thing just like you guys do before... here we are :
 , set the parameter : Foreground = #000000 again you should do the drag thing just like you guys do before... here we are :
7. Duplicate the Layer from the Menu > Layer > Duplicate Layer or you can hit (J)... is that so simple??? On this duplicate layer, choose Invert from the Black color into White ofcourse... (please, take it easy... it's automatically changed! hehehehehh...) Done??? Or you gt the distraction into porn things? Hmm... OK... next part we'll do, flatten the Layer with Ctrl + E, Copy all the layer to get this sample :
 (before Invert)
 (before Invert)
 (after / final)
8. rite anything you want with (T), choose Tahoma > Bold > 11pt #00000


View Indonesian Version Here!
Related Topics :


okey, I'll try to make my own! thanks!
ReplyDeleteHello. ..Thx and I interest your post. Wishing you a very Happy day and smile for you http://marketvaluer.blogspot.com/
ReplyDeletethanks for the visit
ReplyDeletethx for ur visit
ReplyDeleteThanks for dropping by, hope you can figure out the deal about the ads! Please don't be sad.
ReplyDeletereturned ur action
ReplyDelete@ all : thnx for froppin' by y'all :)
ReplyDelete@ sariRapet : i'm waiting for that brow:)
sorry OOT, how to mark our pic to be displayed on our posting with our url, but it seems transparant... using photopshop. I never make it! Kindly help. Thanks
ReplyDeletethanks for your comment on mine. actually i want it will be displayed like this :
ReplyDeletehttp://4.bp.blogspot.com/_g0NHgchHeOA/SY5KPDOjakI/AAAAAAAAAZQ/-Fpxgiv_VQ0/s320/Sprei.jpg
does it use opacity?
nope... it doesn't :)
ReplyDelete