Wednesday, April 21, 2010

Movie Quality DVD Cover I.G.

Movie Quality DVD CoverA naval battle will be overcome at the day. Fire in the ruined strips of the west. A new coding, the great ship colored with anger to the vanquished. Victory in a mist.


Movie Quality DVD Cover


The army denied entry to the city, the duke will enter through persuasion. Secretly the army led to the weak gates. They put it to fire, death and the flowing of blood.


Movie Quality DVD Cover

Movie Quality DVD Cover


Tutorial for this image galery post is coming up next.. :p


Saturday, April 17, 2010

The Easiest Way in Retouching Skin

The Easiest Way in Retouching SkinAround these days, I notice, that there's so many professional portrait photography shots. Television, magazines, and even in peoples homes. You might think most of it is taken down from camera professional taking amazing pictures but the real thing is that it actually comes from a damn combination of heavy and huge make-up and post processing things.

Obviously, when it comes like this, (huge make-up and bla bla bla before the camera, pink) You would easily think that you look silly in some way but guys, when the pictures come back you would absolutely look great. Smoothing the colour tones and covering skin blemishes, and amazingly, Photoshop can do that.


So many areas of portrait retouching you can expand but in this tutorial I will be just concentrating on cleaning up and softening the skin with the easiest way I know using the Smudge Tool.

The Easiest Way in Retouching Skin
Source ; sxc.hu/photo/1141475


First Step

Open your image. Correct the levels of it. I'm not gonna complicated your day by arranging levels adjustment, shadows, or anything. Here I just want you to correct the level of the image by using the Auto Level Adjustment or simply press Shift + Ctrl + L from your PC.


Step Two

Remove the imperfections area you want on face such as spots and skin blemishes. You can use the Cloning (S) and Healing Brush (J) tools.


Step Three

If you've done by that two tools, now you can start cleaning it up by the 'main course' of this tuto tool, Smoodge Tool (R). Before that, for better result, Sharpen your image first, go to menu Filter > Sharpen > Sharpen, do this step twice by easily pressing Ctrl + F from your PC to reload the last effect you used, taht was Sharpen.

Now, call up your Smoodge Tool (R) and set the mode to Normal and set the strength in about 30-40%. Start clean the face by this tool. Easy.. easy.. calm down.. you got it!


Use these settings carefully and finish your scratch the paint over the skin, and, voila, you're DONE!!!

Result

Click to enlarge!
 
View other samples here!

Excite a schadenfreude and watch it slobber


Friday, April 16, 2010

Buying or Selling World of Warcraft Accounts

Hello folks, gratefuly thanks for spending your precious time to read my post. I think you're right, of course, you guys should have fun in your life and here I got an interesting information about Aion online game. Do you guys play this World Of Warcraft game, still having fun with this MMO game, or you're stuck with this game and got the difficulties to obtain the highest level? Don't you ever think to give up doods, there are so many options to make this game more interesting.

Next, allow me to introduce you to this special online games site, Vbarrack.com. This is a special site that buy/sell WoW accounts. So.. As you can see.. Buy WoW Accounts is totally available there. Their former website, known as accauc.com founded in 2007 by a group of experienced players, MMORPG. In response to rapid market development, MMORPG, decided to create a website that serve the MMO community.

Vbarrack.com give honest and complete reviews of online games for visitors every month. Well.. There are so many Aion games and it is quite complex. Wow is a best guess nonetheless that runs like 3/4 of the MMORPG market. Just because I’m just that kind of guy, I'm a guild wars man myself, lol.

As part of ongoing efforts to offer the best service and support to their valued customers, their support service is available 7 days a week. Their customer representative team of experienced players who can provide tailored MMO solutions for their customers. When you buy something from VBarrack, you can be sure that we have taken every precaution possible to ensure your personal information and payment details remain safe.

Doods, it’s an all-in-one gaming portal, and as we all know, people are crazy to play something smells Benjamins and I hope you all will visit this website to learn and enjoy playing free online games and earn lot of money. Believe me, it's so much better than Friendster, Linkedin, Twitter, Facebook and other Social Networking Sites! Join Now, For Free!

Thursday, April 15, 2010

Retouched Skin I.G.

Retouched Skin I.G.


genial - Scarlett Johansson Originalgenial - Scarlett Johansson Retouched

genial - Retouched Originalgenial - Retouched

genial - Penuh Serabut Production Originalgenial - Penuh Serabut Production Retouched

genial - Okka Originalgenial - Okka Retouched

genial - Chen Hao Originalgenial - Chen Hao Retouched


genial - Budi Anduk Originalgenial - Budi Anduk Retouched

genial - Anna Pavilion Originalgenial - Anna Pavilion Retouched

genial - Alison Angel Originalgenial - Alison Angel Retouched

genial - Thamires Originalgenial - Thamires Retouched

genial - White Heart Originalgenial - White Heart Retouched

Click each thumbnail to get the original size!


There will be peace, union and change, estates and offices low (become) high, those high very low. To prepare for a journey torments the first child. War to cease, legal processes debates.

See the tutorial of this Retouched Skin here!

Saturday, April 03, 2010

Love just ain't enuf


Love just ain't enuf


plant a tree of love
the leafy of honesty
flowering sincerity
flush with love & affection
nourish with confidence
love is not mathematics that can be calculated
it is not economic gain and loss
without love we are not going to be just like this

Thursday, April 01, 2010

Text on Wet Sweaty Window

Text on Wet Sweaty WindowTutorial kali ini special pake telor karena saiia tulis menggunakan bahasa Indonesia. Menyenangkan bukan?!?! OK langsung ajja, setelah lama menghilang dan hanya muncul melalui postingan-postingan terjadwal, akhirnya saiia bisa kembali menulis tentang tutorial Photoshop. Pembahasan kali ini mengenai bagaimana cara menuliskan teks layaknya teks yang tertulis pada sebuah kaca, jendela misalnya, dll.

Apa ajja yang diperlukan untuk pelajaran kita kali ini? Hmm.. gag banyak en gag ribed... hanya beberapa image source seperti, sebuah photo (pemandangan misalnya atau apalah yang akan kita pergunakan sebagai background) lalu sebuah gambar kaca yang basah (habis terkena hujan atawa embun.

Untuk source image yang kedua, jika jeneungan gag punya, silahkan save gambar di bawah ini...


Text on Wet Sweaty Window


Langkah pertama

Silahkan buka gambar yang baru ajja jeneungan save (kaca basah) di photoshop jeneungan. Lalu buat gambar tersebut menjadi Hitam Putih dengan menekan Shift + Ctrl + U (desaturate). Buat photo hitam putih tadi menjadi agag sedikit gelap dengan mengatur Levelnya dengan menekan Ctrl + L.


Text on Wet Sweaty Window


Kira-kira hasilnya seperti ini... (huehehe... gag terlalu beda iia sama yang pertama setelah di desaturate tadi?). Jangan khawatir kang, nanti baru kliatan, sekarang sii.. huehehehe..


Text on Wet Sweaty Window


Lanjut!!!

Langkah kedua

Buka photo akang tante bunda neng geulis sekalian yang sekiranya akan sampeyan pake buat pemandangan di luar jendela. Sesuaikan photo tersebut dengan ukuran Kaca Basahnya atau sebaliknya (sesuaikan ukuran kaca basah menurut ukuran photo panjeneungan semua, pink).


Text on Wet Sweaty Window


Untuk menambah pemandangan tersebut menjadi lebih realistis, masukkan efek Filter > Blur > Gaussian Blur dengan radius kira-kira 5,5px, lalu ganti Layer Modenya menjadi Overlay dengan Opacity kira-kira 80% cukuplah. Lihat maksud dan tujuan kalimat di atas pada gambar di bawah ini..


Text on Wet Sweaty Window


Demikian kira-kira untuk penerapan Background yang harus kita siapkan untuk mendapatkan Efek Text on Wet Sweaty Window kita. Sekarang berlanjut pada langkah berikutnya, yakni persiapan kita akan Textnya itu sendiri.

Langkah ketiga

We're gonna move to the main strep of our basic great tutorial now. Obvious! Teks itu sendiri! Pilih Brush Tool (B) lalu pilih model standar yang disediakan Photoshop, kita gag akan neko-neko, kecuali klu kitanya emang mau neko-neko... :p


Text on Wet Sweaty Window


Buat sebuah Layer Baru, namai Text on Wet Sweaty Window atau apalah terserah akang panjeneungan sampeyan hatur nuhun hatur tengkyu ararojesss!!! Lalu pada layer baru tersebut, goreskan Brush yang sudah kita siapkan tadi beberapa kata, untuk ukuran Brushnya, akang jeneungan mba ibu bunda abang sekalian silahkan disesuaikan dengan canvasnya, di sini saiia mengurangi ukuran (ujung brush) hingga kira-kira 30%.. lalu... terserah lagi nii kang, tante, mba.. mau nulis apa ajja terserah, bagusnya sii nulis 6raphic.blogspot.com oyyyeee! huehehehehe... gmn... kelar?!?!?


Text on Wet Sweaty Window


Masih pada layer yang sama (layer text buatan akang), kecilkan ukuran brush menjadi kira-kira 8-10px untuk membuat tetesan-tetesan embun yang mengalir pada bagian-bagian tertentu dari huruf yang akang buat menggunakan brush di awal tadi...

Note : Ingat.. buat ukurannya sedinamis mungkin dengan bantuan Bricket [ dan ] pada PC akang, gag perlu takut akan membuat kesalahan.. gag ada yang namanya salah dalam menggambar/design seperti ini, hhmm.. hasilnya kira-kira seperti ini...


Text on Wet Sweaty Window


Untuk memberikan kesan bahwa teks yang kita buat ini tertulis pada kaca (jendela basah dalam hal ini, pink) maka ada perlunya kita menambah sebuah layer baru, namai dengan Putih, siram layer tersebut (yang berposisi di atas layer teks Text on Wet Sweaty Window yang akang buat) dengan warna Putih tentunya, what else?!?! hueheheh... lalu ubah Layer Modenya menjadi Soft Light dengan pengaturan Fill 75%.

Setelah itu, kembali pada layer teks Text on Wet Sweaty Window layer, ubah juga Layer Mode menjadi Overlay, pada bagian Fillnya, isikan dengan 75% atau yang sekiranya akang mba tante bapak rasa cukup...
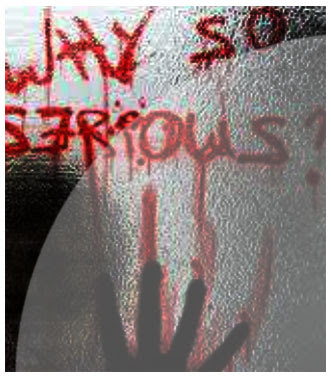
..dan.. taraaa..

Result


Text on Wet Sweaty Window


Download The PSD File here or even Here!

All file downloadable here!