 Hello there! I'm back (once again!!). This time, with How to create your own Signature, this is a really cool trick, which took me some hours write it down, but I think that's GREAT!!! Just so you know... this post is dedicated to my dear Meryl for her question about 'how adding some signature for a picture'.
Like I said before, PSD Holic will show you doods a quick and easy way to convert your signature into a really cool vector Photoshop Custom Shape. D'ya guys remember about How to install and manage brushes and other presets? This technique also works nicely for converting line drawings or even comic illustration as well.
Surely... It makes a little assumption that you doods have at least a working knowledge of using the Pen tool (P) to manipulate Paths. Also, if you’re planning to play along at home, so... you’ll need to be able to scan your best damn signature (or take a photo of it) and bring it down into Photoshop application.
Well, NO MORE WORDS... LET'S DO IT!
The first step in this process is of course to get your own signature from the paper into Photoshop. The funny thing is.. here I use a red stabillo to make mine, d'ya hve any idea bout it?!?!? lmao!!!

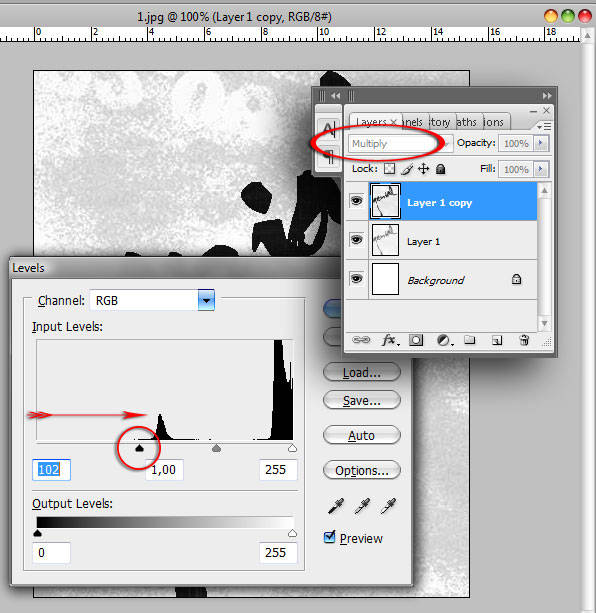
Duplicate your blurry signature layer by simply pressing Ctrl + J. Lets call up the Levels dialog and increase the contrast between the black and white areas of this image. Press Ctrl + L to bring the Levels dialog up and grab the black point slider at the bottom left of the beautiful histogram and drag it to the right until sufficient contrast has been achieved.
See this gorgeous image below, lol, and change the blend mode of your signature copy layer to Multiply, the dark part becomes more darker with this kinda process.
 We’ve got a good dark signature now, we need to convert the writing to a selection. Now you could try to select it with the Magic Wand Tool (W), or by selecting a color range, but... I’ve got a much better... and damn... more accurate to do this with black and white documents. Merge this two Layers (Layer1 and Layer2).
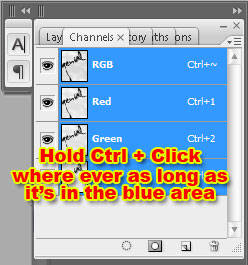
Lets switch over to the Channels palette. See the image on left! Hold Ctrl + Click anywhere on the blue area, this act will make a selection just in about the dark area of your signature... Done?!?! Once the selection is made... Reswitch to Layer section again! Go ahead doods... lol.
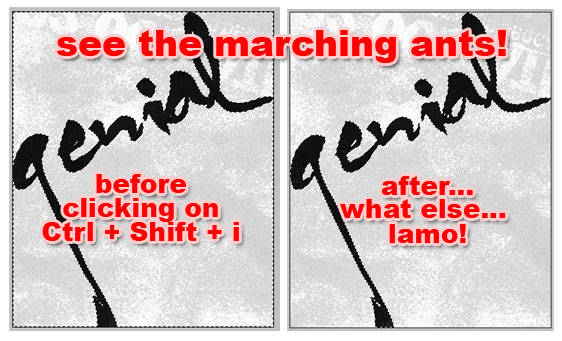
See image below... the difference is the marching ants looks like.. lol. If you have done switching back to the Layers palette.. you will get the 1st left image right?!?!? Inverse the selection by pressing the Shift + Ctrl + I. Look the difference after you did it.
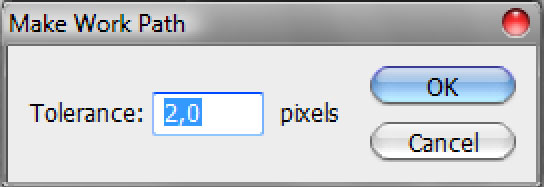
Brilliant!!! Now select the Marquee tool by pressing the M key, then Right + Click anywhere along the "marching ants" of the selection on the stage and choose. Make Work Path from the menu that comes up.
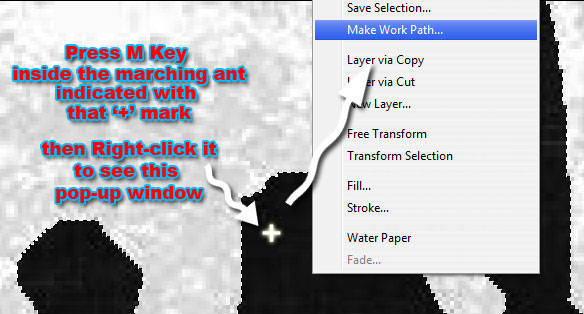
The hidden Tolerance dialog box will then appear ask you how many pixels you wish to use as tolerance for your awesome path, in other words, how exactly the path should follow this brilliant selection. I find that a tolerance of 2-3 pixels usually renders a result that doesn’t require a ton of tweaking after the conversion. Click OK to turn the selection we just created into a particular Path that we can now easily manipulate and then simply convert to our Custom Shape.
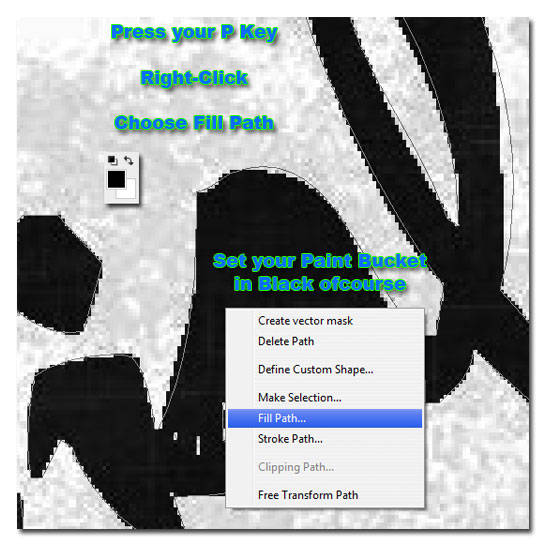
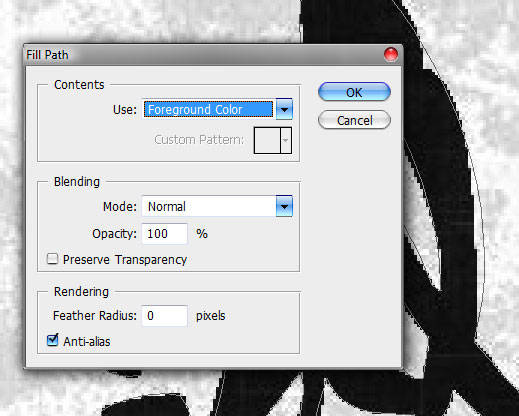
... but before we through it, ... this step is ...
OK, back to our job here... lmao! Once you’ve gotten your paths modified to your liking and with either the Pen tool, Direct Selection tool or Path Selection Tool active, Ctrl + Click anywhere along the path and choose Define Custom Shape from the menu that appears.
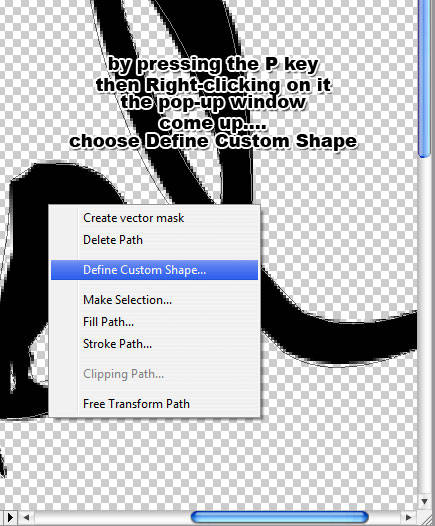
Your sweet custom shape has now been saved and will automatically appear at the bottom of the Custom Shape picker, but let's go one step further and save this signature as a Custom Shape Set for safe keeping, because if you were to select Reset Shapes from the Custom Shapes menu right now you’d loose all your brilliant but hard work as well, lmao.
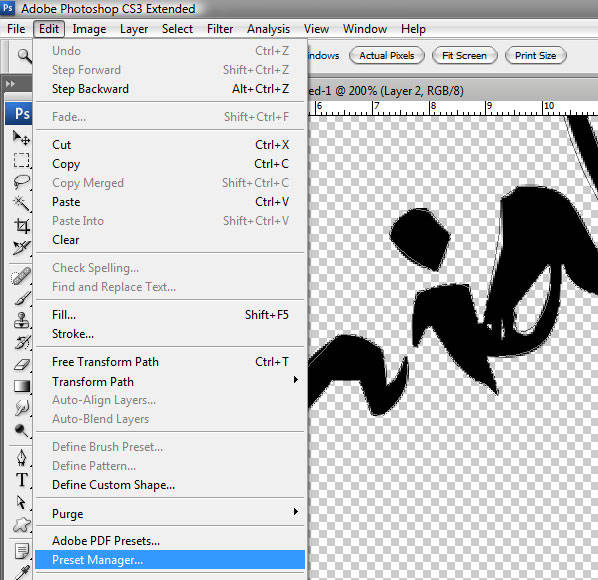
Enter to your main menu, choose Edit > Preset Manager. When the Preset Manager appears, choose Custom Shapes from the drop-down menu at the top of the box, then navigate to the end of the thumbnail samples to find the shape you just created (**new shapes are always added to the end of the list).
Click on your new sweety shape to select it, then click the Save Set. Give your signature a name you’ll remember, pick a location to save to and click OK and you’re all set.

Now it’s time to use your Custom Shape Signature! Switch to the Custom Shape tool by pressing the U key and make sure that you’ve got the tool set to Pixels and Custom Shape in the options bar at the top of Photoshop and of course, choose your new signature custom shape from the Shape Picker.
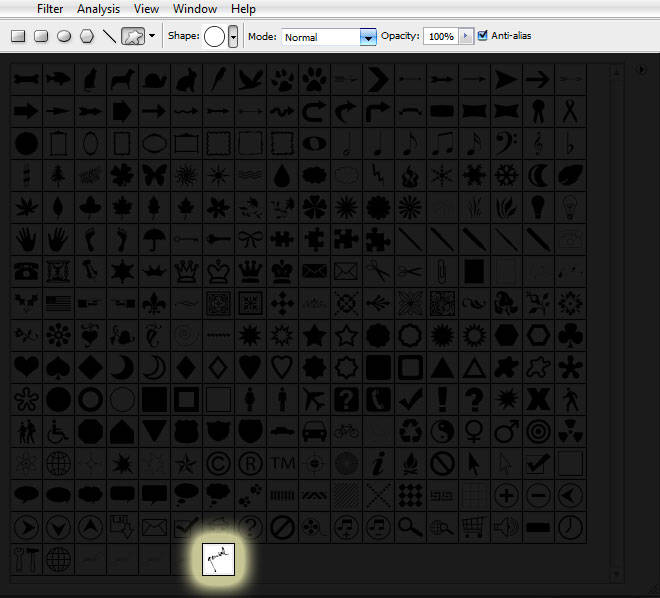
Create a new delicious layer above your image, photograph, whatever! for your signature to live on by clicking the Add New Layer icon at the bottom of the Layers palette, make sure, once again... make sure you’ve set your Foreground color to the one you want your signature to be (here I chose white) and then click and drag your signature onto the workflow making sure to hold down the Shift key to constrain it’s proportions.
And there you have it, your own damn signature as a sweet cute lil' vector Custom Shape perfect for signing photos, adding copyright watermarks, forging your wife’s name on your new motorcycle purchase, whatever your little heart desires!
Yupp.. this post is dedicated to dear Meryl
Well, that's "only" it... Since I used my own mark here, no download is available for this lesson… not that you should need one anyway, lol.)




hmmm... mau protes dulu. baru ntar komen postingannya.
ReplyDeletemasa aku dibilang akang sih. nama aku aja princess, berarti neng. hehehe.
nah itulah dia susahnya, kemampuan photosopku cuma bisa edit poto doang. hahaha
ok lah tutornya. si akang memang kreatif. harus berguru banyak nih.
ReplyDeletesalah kang. rere itu nama di cerpen. bukan namaku.he3x.
ReplyDeletekirain namaku yah. huftt, bandung panas
ooo gtu iia.. huehehehe.. iia mangap deee :) pis!!!
ReplyDeleteKok bisa pinter gini sih....
ReplyDeletePhotoshop gue gini2 aja, mentok gak jalan2, wkwkwkkwk....
Thx ya buat tutor'x :)
wah potona sapa atuh Gen...heheh...menuju tkp...
ReplyDelete@ Zippy : wahh komentar ngasal iia kang?!?!?!? merendah ajja nii... :( jd atut nii saiia nya :(
ReplyDelete@ wh : huehehehe... temen blog kang.. pinoy girl.. eee.. lady ding... ee.. apa sii klu udah punya laki?!??!?!! wkwkwkwkwkwk...
wah.. kreatip banget! mana gambarnya kegedean lagi.. hihi :P
ReplyDeleteBingung, secara, saya gak bisa bahasa Inggris :( nyari transletter dulu. Pengen bisa sih kayak githu tapi, apa daya bahasaku tidak bisa :((
ReplyDeletesekali lagi top lah nih postingannya haha, kalau yang ini kayaknya udah ngerti gue, dan tambah bisa pastinya setelah baca artikel dikau :P
ReplyDeletewow! It's dedicated to me! ^_^ so sweet ^_^
ReplyDeleteThank you so much for making me a watermark dear ^_^ I really love it. It's so nice ^_^
@ Meryl (proud pinay) : yupp dear.. it's an honor to me present this one :)
ReplyDeletewoooooowwwwwww muantabbbbbb....makasih gen sharingnya....kereeeennnnnnnn
ReplyDeleteWoooooooooowwwwwwwwww kereeeeennnnnnnn.....makasih gen tutorialnya.....muantabbbbbbbbbbbb
ReplyDeletemantaaaaaaaaaaaaaabbb akang berdua iniiiii :))
ReplyDeleteweksss... kok bisa salah posting msg sehhh cape dehh... hiihih pangaruh ngantuk pa laper nih yahh *auah :P *
ReplyDeletenti kalo mo bikin tanda tangan tia warnanya pink yah kak.. catett **kaborrrrr**
cateeeeeeeeeettt :p
ReplyDeleteklo baca tutorialnya kyknya gampaaang aja.. coba deh klo saiia nyoba ndiri weee mpek pusing ngerjainx..mo donk dibikinin mz gen hihihi..oy post sy trakhir g mksd bikin takut..jujur sy jg lama2 jd takuut klo baca ulang..thx y mz
ReplyDeleteWah! Bisa begitu juga ya ternyata? dicoba dulu ah...
ReplyDeleteaku kemaren buat pake my-live-signature.com
ReplyDeletecoba ach,,siapa tau juga bisa bikinnya..thanks atas tutorialnya ya sob...
ReplyDeletedikandangin maksudnya??? mb g ngerti
ReplyDeletelengkap nih tutornya,..good man..
ReplyDeletegw demen banget dahhh
ReplyDeletethanks a lot, tutorialnya muantap banget. Baru tau nich ternyata bikin tanda tangan gitu ya
ReplyDeletekekenyangan malah nga konsen kak.. niat mo bikin malah kaco nih.. sotoshop nya malah nga ada *ditaro dimana sih ma kakak tombolnya**
ReplyDeletesignature nya tia warna pink biru jg gpp kak biar mirip ma jepit rambutnya Tia*ambil pulpen ma kertas juga ahhh^
Makasih sob infonya membantu banget buat newbie photosop seperti aq.thanks ya
ReplyDeleteaqo bli lagi Gen...mo bangunin Saur-saur-saur-saur-saur-saur-saur-saur-saur-saur-saur-saur-saur-saur-saur-saur-saur #sambil teriak-teriak pke megapon....#
ReplyDeleteWaaa.... Ngajarinnya sambil promosi niy,, masa' pake nama sendiri sih?? hehehe
ReplyDeleteegh princess kan cewe, kog dipanggil akan??heheh kumaha ieu?? ^_^
nice post bro.. thx udh bagi² ilmunya..
ReplyDeletesalam kenal
Sang Mister apik tenan karyanya yach....
ReplyDeleteOooo..itu dari Reviewme... :D
ReplyDeleteCoba aja...
Atw jangan2 udah daftar..?? :D
Huahahhaah, sabar...
ReplyDeleteItu tergantung kategori Blog yang disubmit :D
Ada trik'x, xixiix...
Ntar tak bagi2 :D
baca yang seperti ini harus sabar, gak ngerti2...makasih sharingnya.
ReplyDeletejawab komentar di sda:
maksudnya kebudayaan sendiri juga diajarkan ke anak, ini karena tinggal disini, jadi kebudayaan daerah sini juga diajarkan ke anak, tentu yg baik-baik. maaf kalau artikelnya membuat bingung.
halo kang saya lagi nih
ReplyDeletesoal blog tak diakui di google, mungkin postingan saya ini bisa membantu:
http://www.madegelgel.com/2009/08/mengapa-blog-hilang-dari-search-engine.html
sukses mas!
Salam Cinta Damai dan Kasih Sayang ‘tuk Sahabat Sahabatku terchayaaaaaank
ReplyDeleteI Love U fullllllllllllllllllllllllllllllll
hehehehehe manstaaaaaaaaaabs
ReplyDeletebolehlah utk kujadikan guru...
ReplyDeletemantaaabbbb gennn....:)
ReplyDeletesukses selalu iyaaaaaaa
ReplyDeleteHi there! Thanks for dropping by.
ReplyDeleteAbout joining the giveaway, just follow the links to the giveaway's host blogs. You'll find the instructions on how to join there.
keren... sayang ga jago photoshop - cuma ngerti edit foto doang :)
ReplyDeletejadi pengen nyisipin signature di bawah tiap entry XD
ReplyDeletenice tut, ;)
hihihi keren... tapi aku ga familiar sm photoshop
ReplyDelete:D
ternyata bikinnya pakai photosop ta signature seperti itu, baru tau. hehe...
ReplyDeleteliat tutornya kliatannya gampang, bareng aku coba kok sulit ya.. emang payah aku di photosop, kudu rajin-rajin baca tutor di blog ini kliatannya. :)
it's the good tutorials
ReplyDelete. klo disimpen dlm bntuk brush bisa kn ya....
ReplyDelete. jgn b. inggris po'o....
. gk ngertiii
Gak mudeeenngg... hihi..
ReplyDeletenice great editing, you arethe best editor friend
ReplyDeletesalam friend
ReplyDeletenice post,,,and many friend comment,nich,,,
please take AWARD from blog NURANURANIKU,,,for GENIAL,,thank.
tengkyu yah kunjungannya, maaf nih baru singgah, hehe.. selamat menunaikan ibadah puasa yow..salam knal.
ReplyDeletewowww nice tutorial!! :D
ReplyDeletebener-bener bisaan, aku cuma bisa adobe photoshop doang.. Belajar ah ama kang tutor ini
ReplyDeletetambah keren aja sob, cape de....
ReplyDeleteapik kang, swiep mantabz.... kalo mampir kemari sayah selalu kagum, bolehlah kang kapan2 sayah berguru pada ente :D
ReplyDeletehi genial, just want to say..thank you once again and have a great day..
ReplyDeleteI really like the watermark ^_^
terimakasih buat semua temen2 yang masih mau mapir di sini :( saiia jd sedih :((
ReplyDeletehalo genial (namanya rada2 nih) thanks buat tutornya ya..
ReplyDeletesukses selalu sob!
rada-rada?!?!??! kang... mksd nya?!??!
ReplyDeleteeeehhhh jadi ada tandatangannya gitu ya di potonya.... xixixixi
ReplyDeletewow... aku gak pernah makek itu bro... tips yang menarik nih, jadi kalau punya photo bikinan sendiri bisa dikasih signatur tinggal klik doang.. sip...
ReplyDeleteasli keren sob :)
ReplyDeletetambah mantap aja dha pokoknya
aikido masih tp skrg lg off krn bln puasa tar abis puasa baru nymbung lgi,postingan aikido smtr blm dulu :)
ReplyDeleteUpdate lagi nyooook.... :D
ReplyDeleteTumben rada lama update'x :D
Hi, "G". How are you? This post is very useful. Thanks :)
ReplyDeletekok sedih sih kak.. padahal baru minta traktir sepiring somay ajah.. hhuuhuh Tia tetep mo demo ahhh.. somay .. somay.. :D eh salahh.. shoutbox.. shoutboxxx
ReplyDeleteuhmm kak Gen kenapa sedih ??
update status : siap-siap saur*
ReplyDelete"genial♂ said... @ September 9, 2009 11:03 AM
ReplyDeleteterimakasih buat semua temen2 yang masih mau mapir di sini :( saiia jd sedih :(( " <---- ini bukti akurat dan otentik kak..nga bisa mengelak kannn ^^tuinkkk ^ kalo kakak lagi sedih :((
kang Geny emang top deh... aku saluuuuuuuuuuuuuuuuuuuuuuuuuuuuuuuuttttt... kang geny ajarin buat template kayak gini donk???
ReplyDeletesampe sekarang aku cuma bisa buat tanda tanya..
tanda seru..
salam kenyal
Aduh mbak/neng ! Klo bsa pke b.ind y ! Q mlez yg mw ngartiin bingg sbnyak itu
ReplyDeleteit's make me confused ,. he..he..
ReplyDeleteRAIHLAH “JATI DIRI MANUSIA”.. untuk MENGEMBALIKAN JATI DIRI BANGSA INDONESIA
ReplyDeleteSalam Cinta Damai dan Kasih Sayang ‘tuk Sahabatku terchayaaaaaaaaaank
I Love U fuuulllllllllllllllllll
kok enda kelihatan yaaaaak
ReplyDeleteapdeeeeeeeeeetttttttttttttttttt
Tutorialnya muantab kang..jelas bgt.. aku yg biasanya kebingungan dgn photoshop, kali ini tidak. :)
ReplyDeleteowh keyen kaliii signature-nya!!!
ReplyDeletebtw signature itu apa yah oom pakdhe?!?
no more words tapi tetep aja sampe ke bawah full words juga tu, huu boong huu
Maaaaaaaaaaaaaaaabbbbbbbb baru bisa OL....:)
ReplyDeleteDuh baru bisa ngenet neh....:-(
ReplyDeletenjijal ah...
ReplyDelete@ all : maaf baru bisa onlen ngebalesin komengnya... saiia paranin ajja iia satu2.. marathon time!!!
ReplyDeletemakasii iia all :)
Tolong buatkan dunk gen, lha wong photosop tahunya ngecilin gambar aja ...
ReplyDeletebole kang bole... mana aplot-an tanda tangannya?
ReplyDeletekeren nih tutornya, langsung trial ah ...
ReplyDeletemonggo kang.. moga bermangpaat :)
ReplyDeleteknp slalu ada keterangan error kang iia setiap saiia komeng di tempat sampeyan ?!??!
ReplyDeleteenjoy!!!
ReplyDelete