
 How are you doin' guys? OK. Without any further chit chat or what... I'll explain how to create an envelope using Photoshop.
The size of the envelope here is totally my damn imagination, because if I use the original size of the existing envelope, I am worried about 'producing something that is less than the maximum quality results'.
Step 1
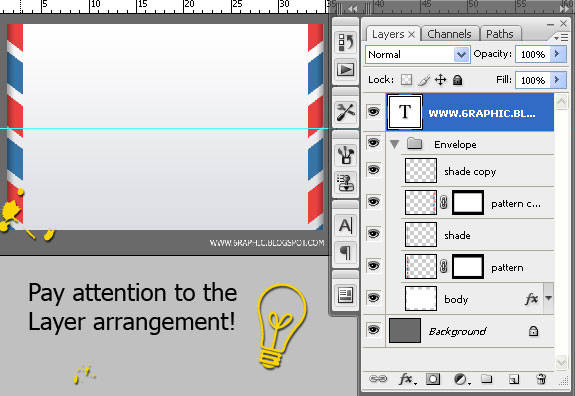
Create a new document in your photoshop. After the new document is ready, let's start by creating a set of folder, give the name envelope.
Create a new layer and name it body or something, it's up to you. Select the Rectangular Marquee Tool (M) and make a selection about the size of your envelope, fill with white.
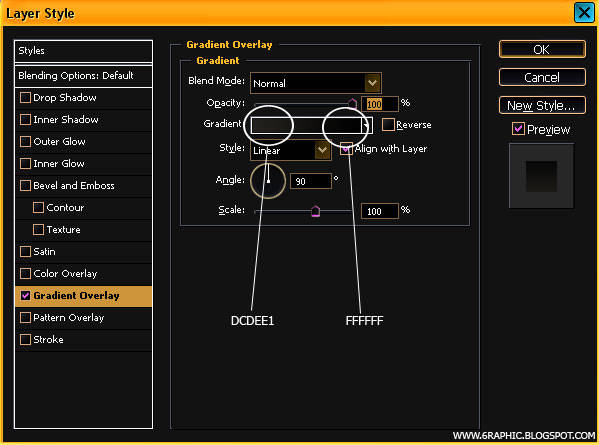
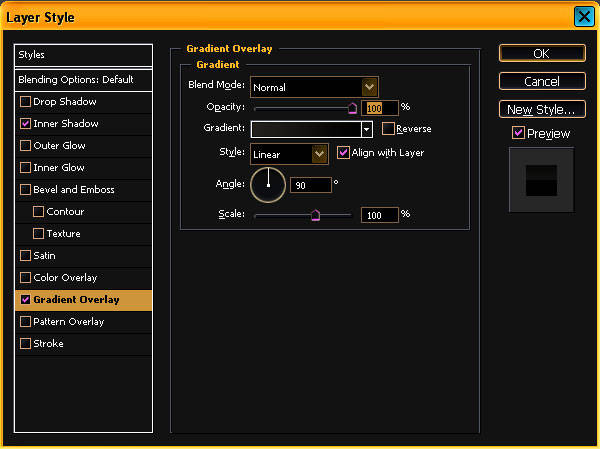
Right-click the layer thumbnail of your layer body just right on the Layers Palette and add Gradient Overlay layer style as I illustrated in the picture below..
Step 2
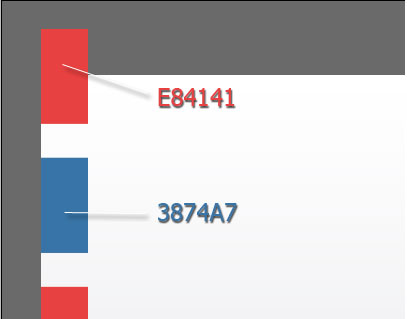
Create a new layer again, then give the name pattern. Like the previous steps, use the Rectangular Marquee Tool (M) again, create a selection then fill the selection with #E84141 and #3874A7. By seeing to the picture below, you could notice the distance between different color boxes, which are important distances between one another in the same box.

Go to menu Edit> Transform> Skew and click on the center as shown in the picture so that we can obtain the skew results in question.
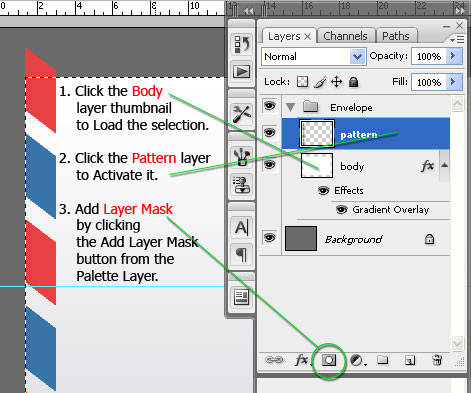
Discard the rest of the box (either red or blue on top and bottom sides of the envelope) by removing them. Here I prefer to hide the rest of it by enabling the mask on the layer pattern.
But how come? Read carefully the instructions on the chaotic picture below. (Do not be deceived by the complexity of the drawing lines, hahaha...)
Step 3
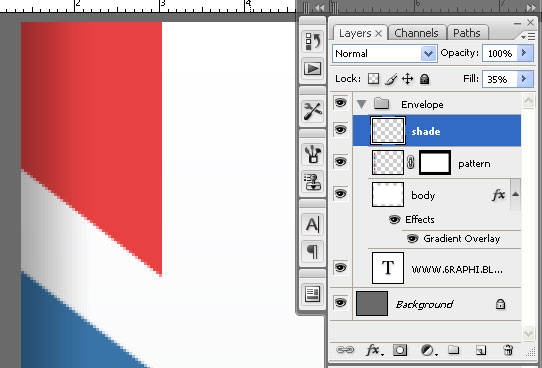
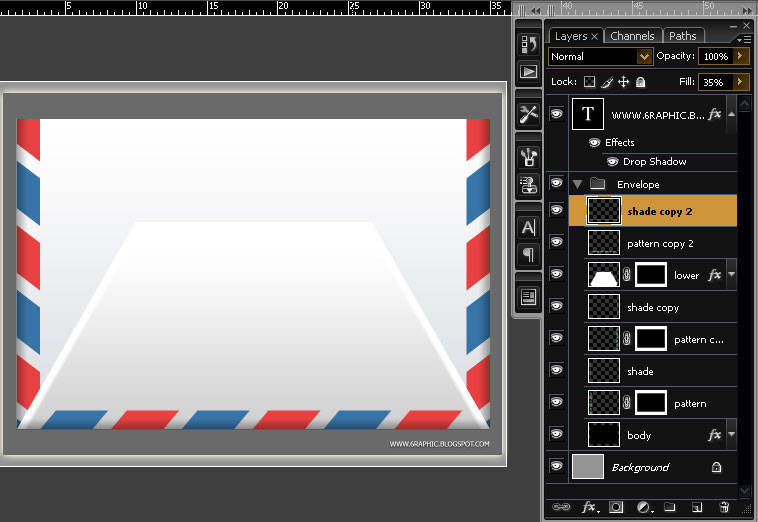
Create a new layer and name it shade. We'll give a little dimension to the side of the envelope by adding a shadow that will add thickness envelope nuance.
OK.. slow down.. On the layer shade, activate the Gradient Tool (G). Click on the envelope, then pull slightly to the middle. Remove. After the image is formed, set the Opacity to about 35%.
Step 4
Turning briefly to Pattern layer. Copy layer pattern and then move to the right side of the envelope. Apply these steps to layer shade, so we will have the right and left complete side with the same pattern and shade, but you have to move it back to the opposite direction.
Until this step here, please submit your complaint in the comments box, whenever you get lost...
Step 5
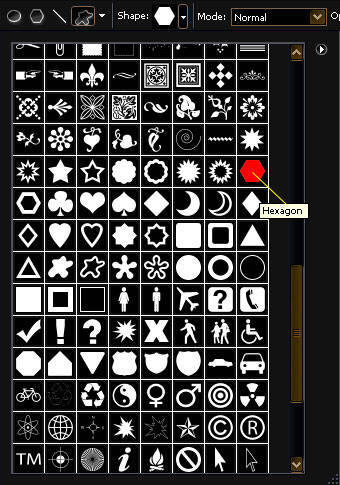
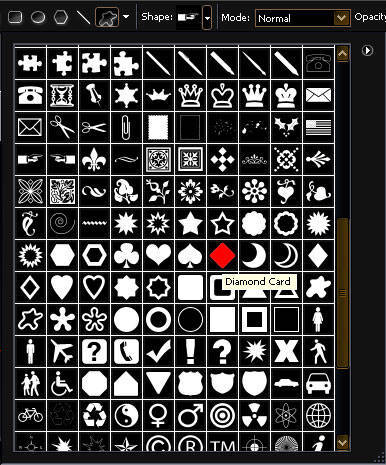
Now we will make a folded paper in the envelope with the requested assistance provided by Photoshop Shape.
OK... straight out, on a new layer (I give the name on it, lower), activate the Shape by pressing the U key on your keyboard, then select the Hexagon as I do.
At this stage, please use a different graphic or perhaps anyone would like to make it manually with the help of Pen Tool (P), please just do it dudes.. hehehehe.. there is no compulsion in religion.. what..??!!
Pull your Hexagon size as I make. Ooopss... I believe that I forget something :p... for the color, please select Black to facilitate the selection later or if there are any obstacles on the road.
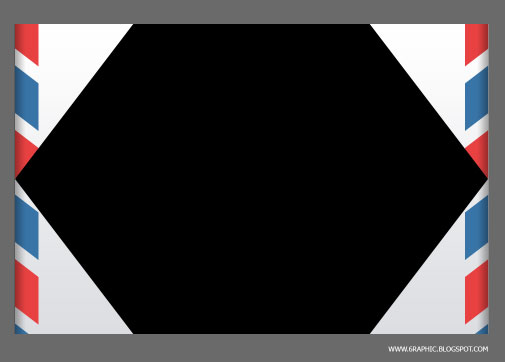
Move Hexagon shape slightly down. Consider the middle point of it, it should end up at the bottom of your envelope.
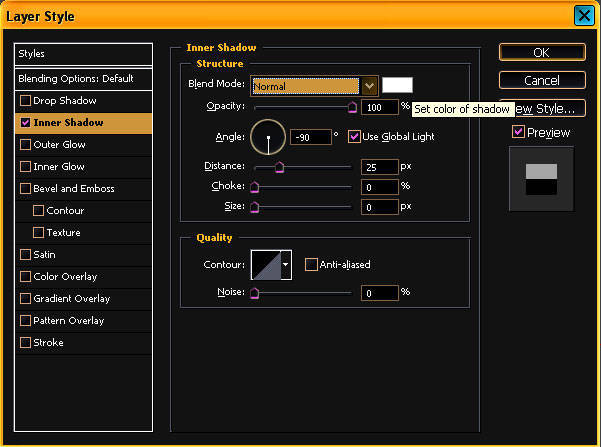
Add Layer styles on your Hexagon layer, Inner Shadow with white color, blend mode is Normal, as I show y'all in the screenshot below.

Still on the same layer, add a Gradient Overlay layer style again with sizes as below.

Voilaa.. This will be approximately like the picture below if you follow the steps I have applied since the first move.

Step 6
Steps to make the folds under the finish .. Means we can apply it to fold the top is not ... easy! But before that I am making a duplicate pattern and shadenya, then my position in the bottom.
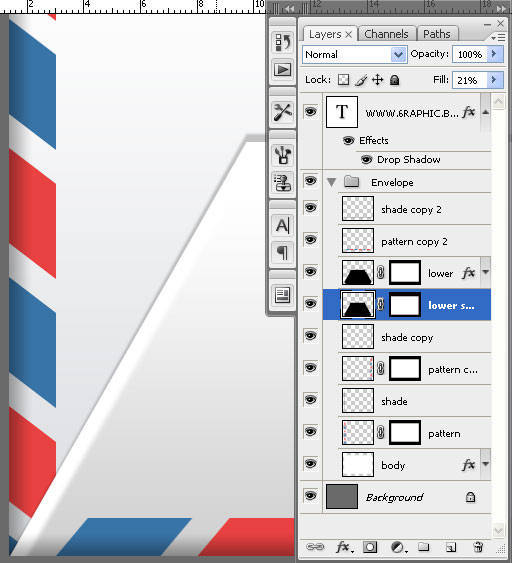
Now, add a little dimension again on the 'lower' layer by giving us a little shadow.
You (beginners) should be careful in this step. Duplicate Layer 'lower', and create a little bit bigger than the original lower layer by pulling on the upper side slightly beyond the limit, then turn the lower opacity down to 21%.
In this step, please.. you should added Blur to make it more realistic look for the shadow of the paper folds.
When you finished this part, then.. go on..!!! Well.. Create the top of the crease. (Please skip this step if you already understand the step 5 in my description above).
Step 7 (Optional)
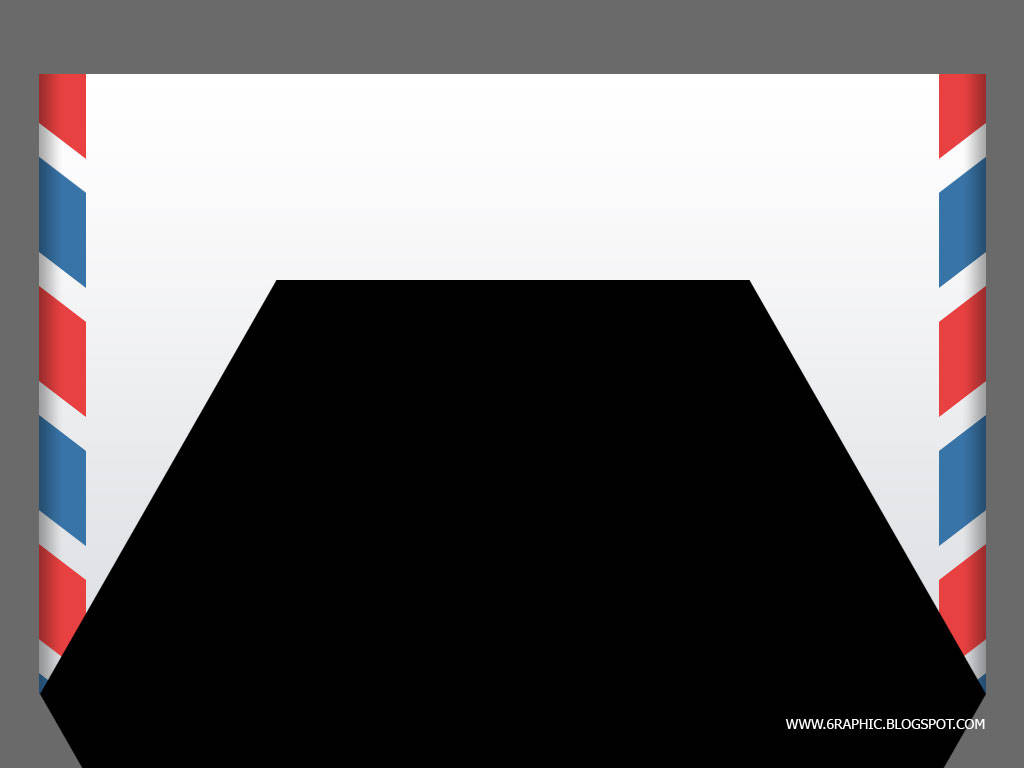
Create a new layer and name it "upper". Press U on your keyboard, select the Diamond card as I do.
Pull your choice (Diamond Card) exactly the same as we did in the fifth step above, only this time, position the Diamond Card at the top of the envelope.
Add Inner Shadow with a set of white, Blend Mode Normal, Opacity 100%, Angle direction -90, and Distance 25 px.
Do not go anywhere, because we still have to add a Gradient Overlay like the picture below.
Before you sip your coffee, you should add the final step of our learning.. this time, you will add that part with a shadow, like a shadow on the bottom fold of the paper earlier.
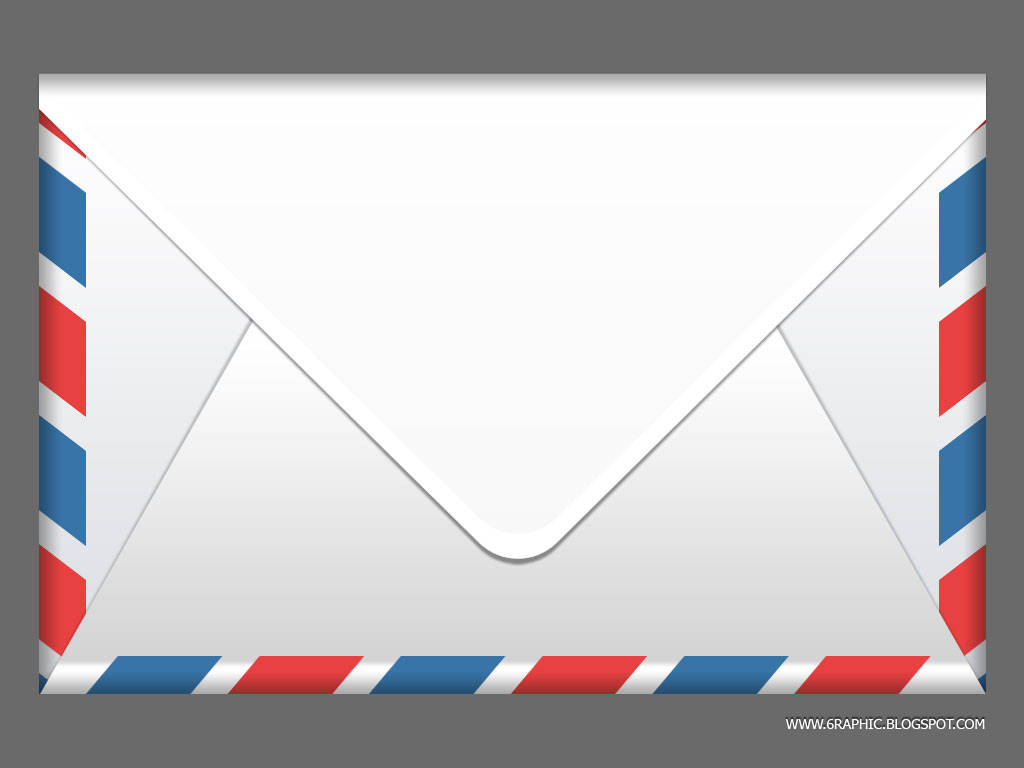
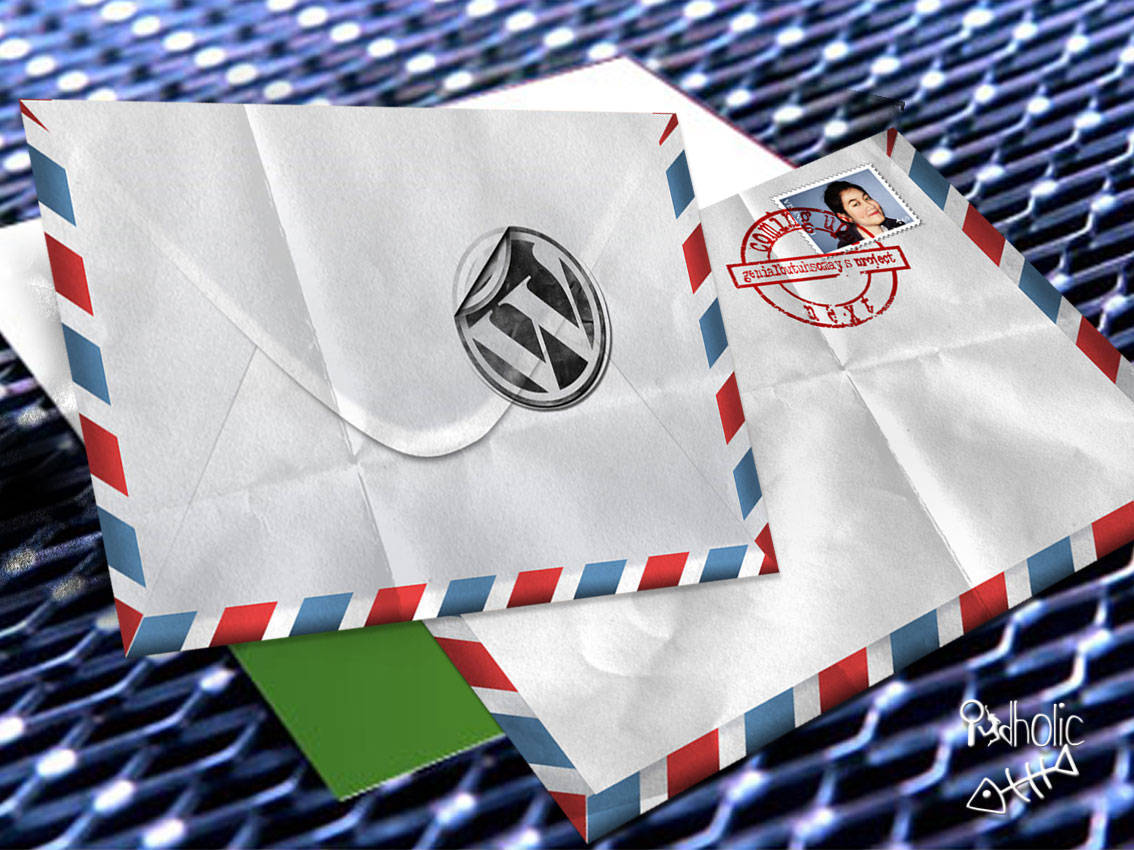
Voila my final Envelope Icon results..
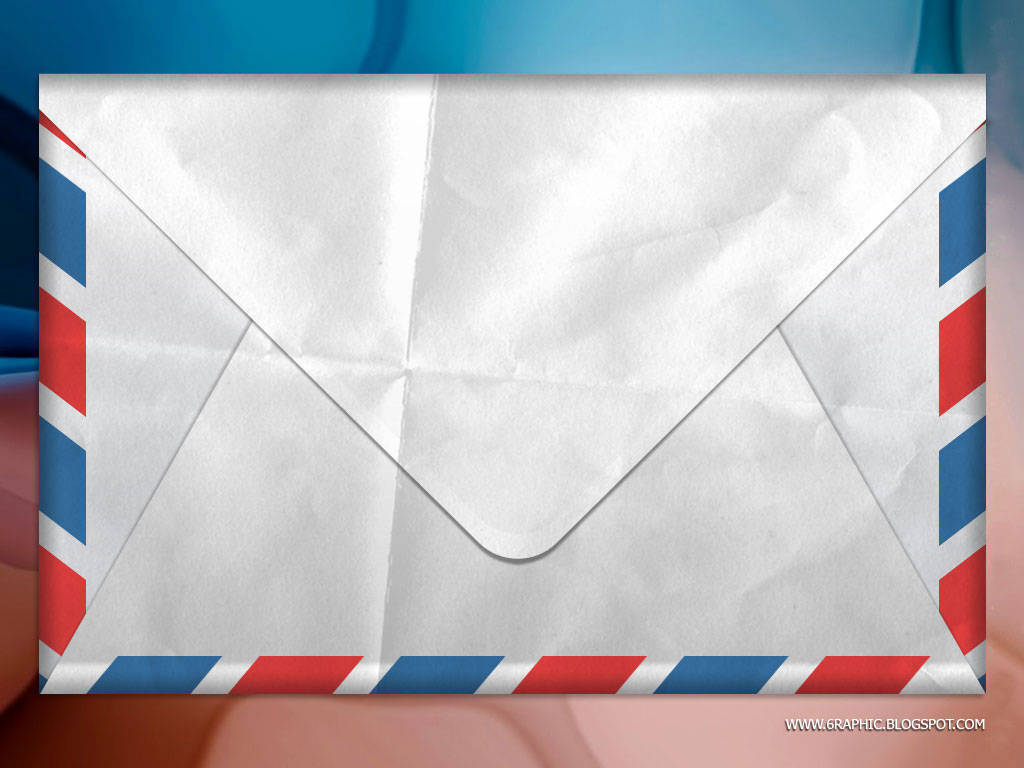
...And with a little magic here and there... finaly I got this.. :) Use your wild imagination doods!


amplopnya gak harus yg masih baru ya? hehe....
ReplyDeletetapi hasilnya bagus, malah keliatan natural.
kapan praktek bikin yah??
ReplyDeletewah,,,keren banget,,,,nice banget,,,
ReplyDeletewah2
@ narti : itu final imagenya masih yg orisinil bun, tp sayang hostingnya kurang bersahabat... gag nongol :(
ReplyDelete@ sda : kapan ajja boleh ko' bun :) hehehe..
@ rezKY p-RA-tama : makasii kang makasii :)
wah asyik tuh
ReplyDeletetapi pattern lekukannya itu kamu buat sendiri atau cari di internet?
hehehehe... klu itu bener akangnya kang... nyari di internet... eee nemu ding, makanya langsung saiia posting yg bginian.. mumpung temuannya blm ilang :)
ReplyDeleteWah si Boz bisaan euy hehehehe...kreative.
ReplyDeletehasilnya kaya beneran ....!!!
masih harus banyak belajar daku ini sob
ReplyDeleteKeren kang, saya perlu belajar lagi untuk lebih memahaminya..
ReplyDeletejadi pengen ngirim surat untuknya
ReplyDeletewow it's cool bro, tq 4 share maybe I will bookmarked this post :)
ReplyDeletebusyeeet deh, keren abis tuh... kok bs sih?
ReplyDeletewah dolanan skew, idenya kereen tenan.. mangtebs :)
ReplyDeleteo iya sob kalo image animasi gif bisa disimpan di blogger sob, contoh file gif sederhana di akhir posting: alkatro.blogspot.com/2010/10/vcc-gratis-tips-verifikasi-paypal.html, saia host di blogger juga :D
itu da label W iia kang???
ReplyDelete@ alkatro : iia ya kang... ko' bisa iia?!?!? saiia selalu gagal masalahnya dari dulu makanya saiia gag pake host blogspot buat animasi :( ternyata salah kang iia...
ReplyDelete@ all : thnks for all doods :)
@ MsGr/MaSGarI : yoyoy :) sekalian gw kasii menu di atas tuu :)
ReplyDeletewah...mantabs ni tipsnya....
ReplyDeletesaya bisa belajar bikin amplop sendiri nih...he..he..
silahkan mas :)
ReplyDeleteamplop itu mengingatkan daku dengan seseorang :halah:
ReplyDelete@genial: enggak salah sob, sepertinya dulu memang blogger gak bisa, wong setengah tahun yang lalu saia pernah ngalamin juga: setelah diupload di blogger gambar animasi gifnya tetep diem :D
sangat kreatif
ReplyDeletedetail bangat sob
nice info bro...thx
ReplyDeletega pernah kekeringan ide..bagus sekali Mas Gen..keren
ReplyDeletetentang Grafiti Creator, sempet bikin beberapa desain tapi diledekin Egha..dia emang bagus klo bikin design grafiti..dengan tangannya hehe..
@ Best Free Webhosting for Wordpress : sekarang uda bisa tokh kang iia :) saiia blm coba lagi sii :(
ReplyDelete@ SI JUMBO : makaasii kang
@ julicavero : sama-sama kang
@ lyna riyanto : tangannya sapa bunda?!?!?! Egha??? linknya?!?!?!
following step by stepnya..
ReplyDeletehasil akhirnya lucuuuu he he...
juga prangkonyaaa :)
weitssss... perangkonya napa wiend???
ReplyDeletecakep bener, keliatan asli dengan kusam2 dan lecek2nya gitu.
ReplyDelete