Showing posts with label Flash. Show all posts

Friday, October 23, 2009

Chameleon photo effect

Chameleon photo effectToday, I will explain you guys how to create trendy chameleon photo effect but not in photoshop, you have to use Macromedia Flash for this special tips and tricks. Ain't need any action script code to make this kinda trick.

Y'll also learn importing any photo into a flash stage, converting it into a movie clip symbol, applying flash filters on it, creating Motion Tween and much much much more! You can use this effect for some photo banner or for some other flash components! Let's start!


I use this image for sample:


Chameleon photo effect


Open a new flash document. Press Ctrl+J key, set the dimensions of your document. Mine is 700x525px. Use any desire color as background, frame rate to 37 and click ok.


Chameleon photo effect


On current layer photo. Double-click on its default name (Layer 1) to change it into My Car or something else you like.


Chameleon photo effect


Go to File > Import > Import to stage (Ctrl+R), import the photo you saved earlier into a flash stage. While photo is still selected, go to the Align Panel (Ctrl+K).


Chameleon photo effect


Photo is still selected, hit F8 key (Convert to Symbol) to convert it into a Movie Clip Symbol.


Chameleon photo effect


Click on frame 110 and 220 and hit F6 key. While you're still on frame 220, pick the Selection Tool (V) and click once on the photo to select it. Go to the Properties Panel (Ctrl+F3) below the stage. On right side, you'll see the Color menu. Select Adjust Color in it and make it like image below said:


Chameleon photo effect


Chameleon photo effect


Repeat obviously the previouse step also for frame 1. You can now do the Right-click anywhere on the gray area between frame 1 and 110 and frame 110 and 220 on the timeline and pick Create Motion Tween from the menu appears.


Chameleon photo effect


We're done now!


Test your movie (Ctrl+Enter).


Chameleon photo effect


The result for this flash trick :


Some other sources you can use to get the Chameleon photo effect :


Chameleon photo effect Chameleon photo effect Chameleon photo effect


Enjoy!


Wednesday, March 04, 2009

Motion Tween

Motion tween is nothing but tweening a Symbol's movement from one position to another. To implement Motion Tween all that you have to do is, provide Flash with Symbol's initial position and the end position. Rest is taken care by Flash. Isn't it really simple.

For example in the above demonstration, I have converted the pencil object to a Symbol. Provided Flash with its initial and the end position, intermediate tweening is done by Flash. Motion Tween animation is as simple as that :)

Okay, you ready to learn how to create motion tween. All you have to do is just follow this tutorial step by step.

Follow these steps:


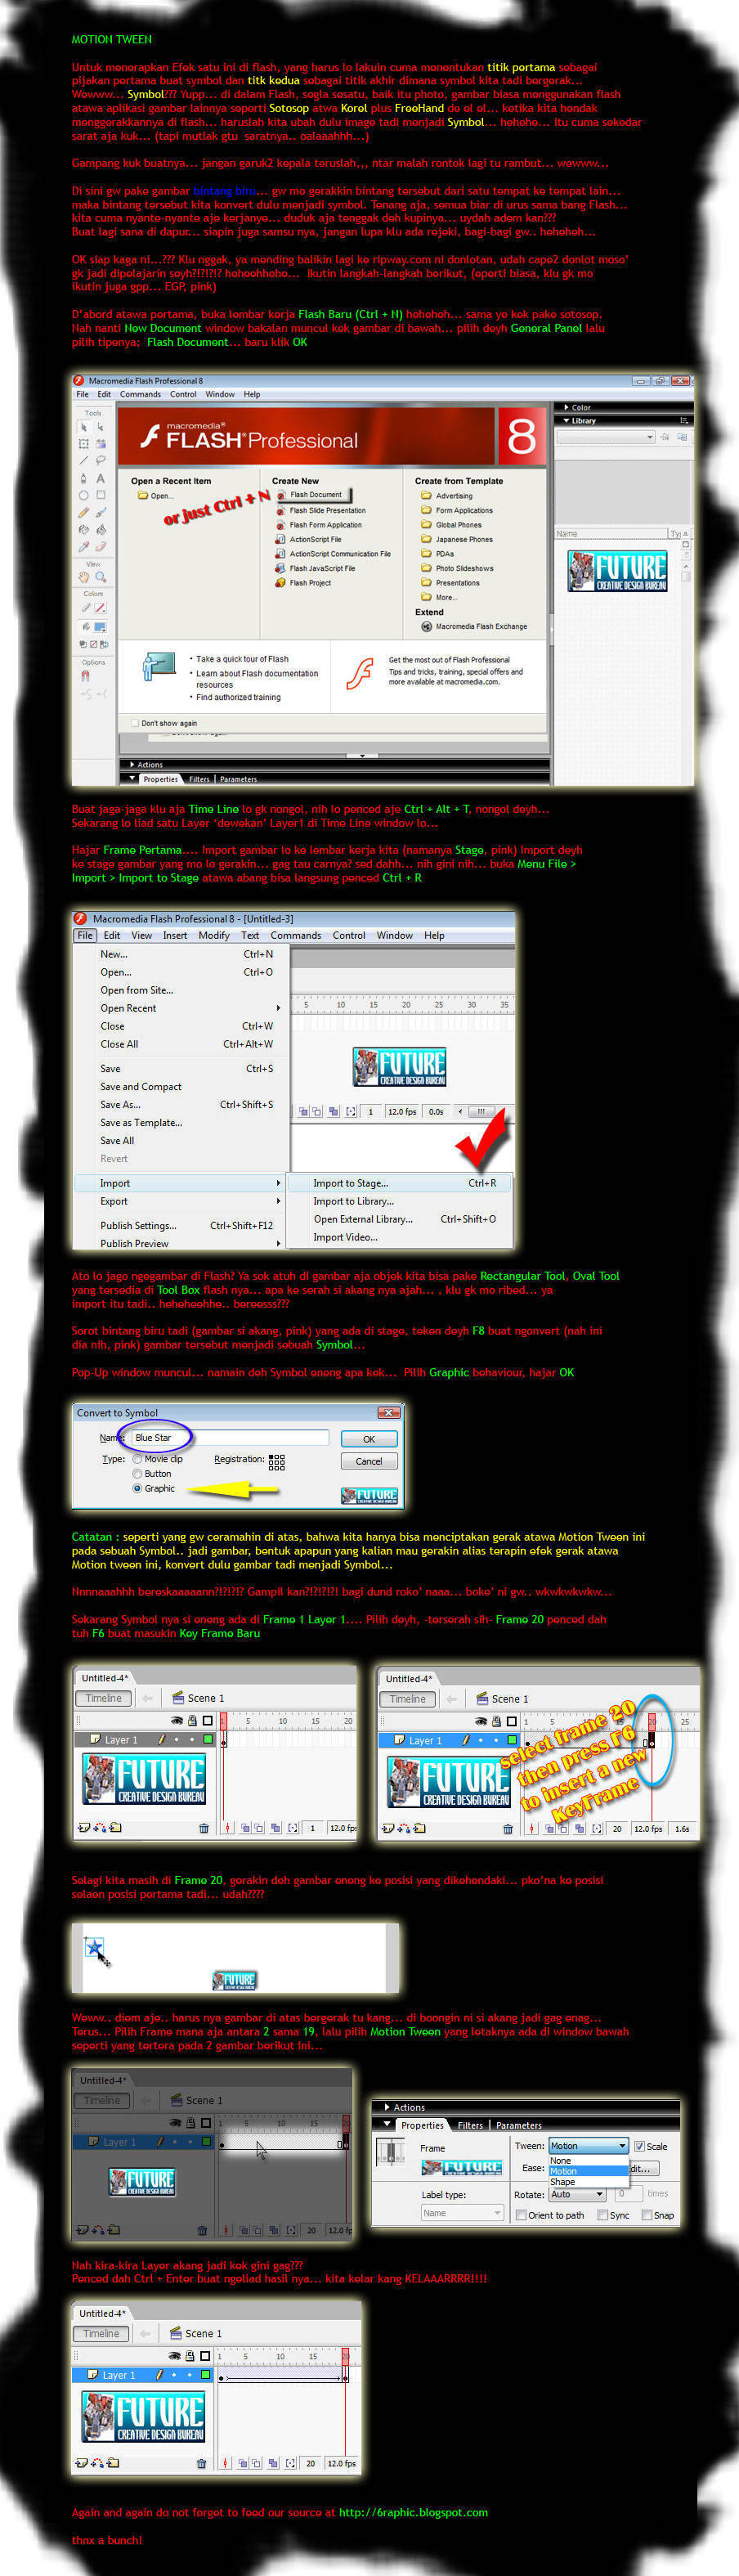
Open a new flash file (Ctrl+N) New Document window will appear...

Select General panel and choose Type: Flash Document, Press OK.
If your timeline window is not open, press (Ctrl+Alt+T).

Now you can see a single Layer called "Layer1" in your timeline Window.
Select the first frame. Import your image onto stage, upon which you would want to implement motion tween.

File > Import > Import to Stage, or just press (Ctrl+R).

Or you can even draw your own object, you can either choose Rectangular tool or Oval tool from the tool box and draw your desired shape.

Now select your object on the stage and press F8 to convert this image to a Symbol. Convert to Symbol window will pop-up. Name your Symbol what ever you like. Select Graphic behavior and press OK.


Note: You can create motion tween only on symbols. So any object upon which you would want to implement motion tween, First convert the object to a Symbol.


Right now your Symbol is in frame1 of Layer1. Select frame 20 and press F6 to insert a new keyframe.


Still keeping playhead on frame 20, move your Symbol to any other position other than the present one.


Select any frame between 2 to 19 and select Motion from the tween pop-up menu in the Property inspector.


Now your Layer will look something like the one shown below.


Now press Ctrl+Enter to view your motion tween.


View Indonesian version here!


Related Topics :

  • Attractive Photo Animation
  • Valentine’s day - 14 th February


  • Saturday, February 07, 2009

    Valentine’s day - 14 th February


    14th February has been known as Valentine's Day, a time beloved of romantics. This is the perfect occasion for romantic proposals and dating. On this day, gift your sweetheart with flowers (especially roses), soft toys, candles, diamonds, chocolates, gift baskets, perfume, books, watches, jewelry and others. Shower love and enjoy the day with your beloved. During this marvelous day loving heart's come closer and romance fills the air.


    From Jakarta with LOVE... happy Valentine's day guys!


    Coming up next :


    Attractive Photo Animation


    At this time, I wanna show you gow to create an animated photo that is very attractive and practical, using flash. Presenting the image using Macromedia Flash, very simple. You don't need the code like an 'action script' or something... You can use it for a great banner, make a presentation, a header like the look especial work site, etc. etc. This tuts, weww ... forget about that 'tutorial' word! SUCK!

    Sharing this opportunity [hell yeah, that word is more comfortable, lol] also provides how does to import graphics, images, etc. into flash application, how to change image form or the image into movie clip symbols, how to use the Free Transform Tool for manipulating images before, and more.


    First step :

    Open any image you wanna use to animate... here I am... Lmao!


    2nd :

    Open New Document. Press Ctrl+J, widht 300 pixels, height 200 pixels. Choose any color you want to apply the Background, choose 32 for this set, Click OK.


    Third step :

    Go to File > import > import to stage (Ctrl+R) then import the image to that new blank document.

    4th :

    When we still get the image selected, Ctrl+K (align panel) do this thing:

    1. Make sure the Align/Distribute to Stage active
    2. Hit Align horizontal center button
    3. Kiss Align vertical center button

    Fifth :

    Again and again, when the photo still selected, hit F8 (to change image into symbol) directly you'll get the Movie Clip Symbol


    Sixth :

    Click frame 15, 40 and 50, go on hitting F6

    7 sign :

    Go back to 1st Frame, choose Free Transform Tool (Q), do this thing!


    8 Balls :

    Pick Selection Tool (V), put the image on this position
    :

    After that, do not forget to drink up your cold beer or something...


    Step 9 :

    Back again, you should pick Transform Tool (Q), do this:

    10 :

    OooPpspss...

    then:

    Step 11 :

    Hit frame 15, choose again Transform Tool (Q), decrease one more time your image..

    12 O'clock :

    Do this with : Transform Tool (Q)

    Step 13 :

    Choose frame 40, kiss the Selection Tool (V), click once the image to make sure that the image seleced. Go to Properties Panel (Ctrl+F3). Open your eyes, on the right side, you guys could see the Color Menu, pick Alpha, drag to 65%.


    Step 14 :

    Do the right click anywhere you want in grey areabetween frame 1 and 15, frame 15 and 40 and frame 40 and 50 in timeline, choose Create Motion Tween from the Menu appeared. Look at the bright side...


    Step 15 :

    Go back again to frame 15, re-open Properties Panel (Ctrl+F3), do this thing:


    It's a wraaaaaaaapppp!


    Download Sample Here!